Showing posts with label By Hand London. Show all posts

Friday, December 12, 2014

Miss Kimberly Paints in Watercolors: BHL Kim Dress


Perhaps I've watched Indiana Jones too many times, but I'm a big believer in the quest. Whether it's hunting down just the right Christmas present for Great Aunt Myrtle, or searching for the perfect set of long-lasting, colorful pens (Ahem: Triplus Fineliners), I love a good mission! To that end, I'm often sewing with a quest in mind, trying pattern after pattern until discovering my platonic version of a garment. I've found the classic shirtdress, conquered the A-line skirt, and--most recently--sewn the perfect party dress.

That last one really shouldn't have been so difficult! Yet, as a plus size woman, party dresses have forever been the thorn in my sartorial side. Your ready-to-wear shopping experience may differ from mine, but buying basics isn't that much of a trial for me. It still sucks, admittedly, but I at least have success. If I'm going to buy RTW, I know that Loft carries my favorite jeans, Talbot's stocks the coziest sweaters, and Asos Curve produces my favorite coats. Fancy dresses, however? I have no go-to. Inevitably, dresses for plus size woman are boring shifts, overly embellished horrors for mothers-of-the-bride, or ill-fitting polyester disasters. It was shopping for a party dress that led me to sewing, in the end. I just couldn't take one more bout of shopping for something pretty and ending up with another black dress.

Nowadays, I sew a ton of dresses, as you know. After years of settling for mediocre RTW pieces, I can't get pretty fabrics and floofy silhouettes out of my head. Every time I put a handmade dress on, it's striking a personal victory against the body-shaming, unwelcoming fashion industry. Unfortunately, my number one battle remains the cocktail dress. Striking a balance of sexy and sophisticated proves a continuing challenge. Inevitably, I sew a silk wiggle dress, love it in photos, then never reach for it when an event comes up. If I analyze why, a simple answer emerges. I want to be sexy, sophisticated, and not horribly self conscious all night. I hate worrying about panty lines or squeezing myself into some stretchy torture device disguised as shapewear. Y'all, I would throw a bonfire just to burn my Spanx and roast marshmallows over their stretchy corpses. The easiest way out of this conundrum would be to use a luxe fabric, with my tried-and-true dress pattern, Simplicity 1873. Yet...I long for extra details and a bit of sass.

Enter By Hand London's newest pattern: the Kim dress.


When BHL reached out to their testing pool with this pattern, I squealed out loud in delight. There are two Kim variations: a square-necked princess seamed bodice with a tulip skirt, and a sweetheart princess seamed bodice with a gathered, pin-tucked skirt. Jenny actually sent me a message not long after, making sure I'd gotten this e-mail, because the gathered view just screamed "Mary." She was right. So, so right.

Y'all, this is the party dress of my dreams. Not only does it mix sex appeal with sweet design details, but it has a fairly expansive size range. The Kim dress goes up to a UK 20, which translates to measurements of 45-38-48 inches and 114.5-96.5-122 centimeters. That puts me (46-35-46) at a base size 18, so I jumped at the chance to test this baby.

Today, I'm sharing with you that first version of this pattern. Usually, I keep my tested versions of a garment on the down low, because I prefer to blog about finalized patterns. However, since most of the testing pool loved Kim's fit, there aren't substantial changes between this version and one that comes in BHL's envelope. Ergo, I can review it like a real dress. Huzzah! Of course, because this is a quest, my Kim isn't perfect quite yet.  For testing purposes, I sewed as close to the original pattern as possible, which meant choosing a size 18 and performing an FBA, but nothing further. Thus, there are some changes I plan on making the next time around, but we'll get to those.


First, let's talk design, shall we? As you can see, I chose my initial love: the poofy-skirts, divinely feminine View A, sweetheart neckline and all. The bodice is lined in jade cotton batiste and there is a 22'' invisible zipper at the center back seam. Honestly, I was trepidatious about the princess seams of the bodice. Though I'm now to the point where they turn out well, I still find the fitting and sewing of princess seams to be in an utter pain. All that clipping and pressing and smoothing! Egads! Scarier yet, Kim's princess seams didn't come in from the armscye, as is most common, but from the sweetheart neckline itself. This, it turns out, was actually a plus. Since the curve of vertical princess seams is less drastic, the FBA was infinitely easier. After moving the bust point down just a hair, the whole process was a breeze and my pattern pieces didn't distort whatsoever. Considering the end results I'm used to, that was a miracle!

Fabric wise, I chose this beautiful watercolor floral from Hancock Fabrics. It was lovely, had a nice weight, but fluid drape, and was 100% polyester. I usually sew with natural or semi-natural fibers, but couldn't get this gorgeous print out of my head. Each time I visited the store, I would pet it a little, wishing it were silk. So, I bit the bullet and bought it anyhow. It proved really easy to sew up, except for one step: those pintucks. That's the only area of Kim that really gave me fits. I spent hours marking and sewing those pleats, friends. Part of it was the fault of the fabric, which wouldn't hold a crease at all, but the other was the sheer expanse of the gathered skirt. It goes on for eons.  The directions suggested marking certain points, then eyeballing it and using the grainlines to make sure each pleat was even. Call me a perfectionist, but I couldn't handle the unknown. Instead, I marked straight lines in chalk across the entirety of the skirt, and used them as exact guidelines. It worked, but I needed a few glasses of wine at the end of the night.

The rest of Kim was a total cake walk, thank heavens! All the pieces joined beautifully and came together with zero fuss.


Fit wise, the Kim is pretty great for practically out-of-the-pattern. It hits my waist at the right point, hugs my bust in that lovely princess-seamed manner, and is a great hem length for a fancy dress. Next time around, I do plan on making a few changes, though. The neckline is just a hair wide on me, showing a bit too much bustline for comfort, if you catch it at the wrong angle. I'm all for sex appeal, but would like to not worry about scaring children, you know? The shoulders also have a tendency to slip, which is partly a fabric issue, but something to be addressed. So, my game plan: move the straps in by a half-inch and raise the entire neckline by another half-inch, then shrink the armholes a hair. That will keep the sexy silhouette, but make wardrobe malfunctions much less likely.

On the whole, I'm inordinately pleased with the Kim dress. All those little design details really elevate it from the usual fit-and-flare dress. It's the ideal mix of sexy and sophisticated--just the dress pattern I've been looking for! The best thing of all, however? No Spanx required. That requires a happy dance, y'all. So, tell me, what is your go-to party dress pattern? Will you be making one for the holiday season, this year? I just ordered some of this damask velvet from Mood, for a wintry Kim, because I couldn't resist another fancy dress.


Note: This pattern was given to me free of charge, in exchange for testing it and providing accurate feedback. In addition, this post originally appeared on the Curvy Sewing Collective, but I like a record of my projects on Idle Fancy.


Monday, February 3, 2014

Miss Anna Looks Nice Today


Sewing mojo, that fickle beast, has abandoned me in recent weeks. I'm blaming its departure on two things: knits and snow. Not only did I spend four days working on an absolute disaster of a dress, but it's been too damned cold to wear anything not made of wool. Conveniently, I refuse to sew any more cold weather pieces, since I do still live in Texas. It's going to be unbearably hot soon, I just know it! 

What's a girl to do, when she wants spring dresses in the middle of winter? Sew one anyhow. 


When inspiration flies out the window, returning to a beloved pattern always helps. If you can pair it up with luxe fabric, so much the better! Personally, I was rescued by By Hand London and Nani Iro. 

This is my fifth version of the Anna Dress and, hands down, my favorite so far. Though I loved my previous versions, some fitting issues bothered me. The pleats went a bit too high, negating the bust definition, and the waist wasn't quite snug enough for my tastes. So, I retraced the pattern. To address my quibbles, I shortened the pleats by an inch and widened them to take more width out of the waist. 

Voila! A perfectly fitted bodice! The changes were small, but really helped the pleats "open up" under my bust, as the design intended. 


The fabric for this dress is, as mentioned, Nani Iro. I am absolutely in love with this line of Naomi Ito's double gauze prints. They feel amazing against the skin, as soft as your favorite pajamas, and come in the most beautiful, romantic prints. Before making this dress, there were four lengths of double gauze in my stash, which I ogled but didn't dare cut into.They were far too pretty to risk ruining!

When looking through my Giant Fabric Closet last week, however, these fluorescent polka dots demanded use. This particular length was purchased from Harts Fabric, using a credit won from the lovely Melissa's blog, Scavenger Hunt, and made me ridiculously happy. Up close, the teal double gauze looks as if someone came along with highlighter ink and dropped it all across the fabric. It's whimsical, cheery, and just thing for a sewist in the doldrums.


Once again, I paired the Anna bodice with a gathered skirt. With a fabric this drapey, it would be a shame not to add some swish to the dress! So, this skirt is as full as the narrow fabric would allow and filled with the swish factor. It's a perfect spring dress - flirty, colorful, and comfy.

All of the inner seams were serged, because the fabric frays apart like crazy, and the hem is narrowly turned under by machine. As for the zipper, I used a hand-picked zip, that you cannot see in any of these pictures. We're still figuring out the lenses for my camera and the back shots were, invariably, a bit too blurry to use. Trust me: it's there, it zips. Hoorah!


Incidentally, we had one seventy-degree day between cold snaps, just in time to photograph this project! Even our crazy weather wants me to wear swishy dresses. Spring really is just around the corner, no matter what that insipid groundhog says. On that note...international friends, are you aware of our odd US tradition of using golf course vermin to predict the weather? This can't be a worldwide thing. Tell me there's not a kiwi in New Zealand determining the length of summer!

The details...

Things I Loved:
  • The fabric! I always love the fabric I use, as that's the reason I sew in the first place, but this Nani Iro double gauze is just heavenly. I swoon, I sigh. 
Things I Changed:
  • Lowered & widened the pleats.
  • Added a gathered skirt. 
  • Added a hand-picked zipper, as per usual.

Things I Would Change, If I Made It Again:
  • Nothing! The fit is pretty spot-on, now. (Excuse the pun.)

Notions & Fabric:
  • 3 yards of Nani Iro double gauze in "Pocho Teal", no longer for sale at Harts, but available from lots of sellers on Etsy. 

Construction Time:
  • Four hours, mostly because I inserted a zipper by hand. 


Murals have been popping up on the sides of buildings across town, but this newest one is my favorite, even with its missing comma. You look nice today, Blogland!

Wednesday, November 20, 2013

Miss Elisalex Finds Something Blue


Hello, my darling dears! I am late to a party, but that's fashionable, non? The party in question is not, it should be said, a rollicking Wednesday night wayzgoose, but rather a year-long internet fête for By Hand London's Elisalex dress. People love this dress.

People, it turns out, have excellent taste. The Elisalex is a flirty little frock, with her extravagant skirt lines and perfect princess-seamed bodice. She's just the pattern to reach for, if you need a fancy date night dress to knock his/her socks off.


As for me, the Elisalex was just the thing for my date with destiny. 

Destiny and loads of presents are the same thing right? I made my second Elisalex (the first a wearable muslin of sorts, to be blogged shortly) in Italian cotton brocade, for my bridal shower this past weekend. Thrown by my two best friends, maid and matron of honor, I was given specific instructions to do nothing but show up to the shower "in something fabulous." A brocade Elisalex, paired with my new blue Seychelles heels, fit the bill nicely. 


This blue-and-white cotton brocade has been in my fancy fabrics box for about a year, after I impulsively bought it from Fabric Mart. It was $24/yard on sale and, with a buttery soft feel and surprisingly soft drape, was worth every penny. They had a least a dozen colorways of these brocades, but this blue set my heart fluttering. I had to have it, despite not knowing what the heck I'd do with it. It was an auspiciously good buy, because this fabric screams fancy bride at her fancy bridal shower. 

It also, of course, frays like the very devil and doesn't hold stitches terribly well. Why must the beautiful things always be evil? Just once, I'd like a party fabric that's easy to sew up or a purple tree frog that doesn't secrete toxin. 


To be fair, I wasn't exactly easy on this fabric. Despite doing not one, but two, Elisalex muslins before starting this project, I still took a few fit adjustments mid-construction. There were princess seams to tame (after a six inch FBA, which we'll get to in a second) and whimsical skirt proportions to nip the whimsy out of. The seam ripper got quite a lot of usage during this project. 

When muslining the Elisalex, I knew the skirt was going to be problem. It's all very well and good for wee tiny sylphs to wear Marie Antoinette proportioned tulip skirts, but I was skeptical about how one would translate onto my viking warrior princess build. The skepticism was well placed. My hips would have looked right at home participating in the Albuquerque Balloon Festival. So, for this version, I took four inches out of the length and used a size 10 skirt, instead of the size 14. 

It was still too wide. Thanks to the body of the brocade, those hip curves went out for days. I took an additional four inches out of the side seam curve apexes, after sewing it all up. The result is still a pegged tulip skirt, but one of more modest proportions. I dig it. 

Thanks to all the taming I did on the side seams, I also made the executive decision to do tuck pleats at the waistline, instead of the box pleats prescribed by the pattern. They just fit the new silhouette more. Woohoo for massive structural changes, while working with delicate fabric! 


The other major pattern adjustment was the aforementioned full bust adjustment. There is a reason I don't often work with princess seams, y'all. Namely: the six inch discrepancy between my bust and high bust measurements. An FBA for princess seams is already finicky, but adding three inches to a curved pattern piece turns a pleasant, challenging fix into a Herculean labor. My resultant pattern pieces only resemble their foremothers, in that they are on pattern paper and say "Elisalex" on them. 

My center front (charmingly spelled "centre front" on the pattern) still needs a bit of tweaking, but I was too impatient to sew this up last week. It's just a bit too wide at my underbust, which causes a crease, after hours of wear. One more muslin, it is!

If you have a large bust and are looking to do an FBA on a princess-seamed pattern, By Hand London's own tutorial is a great resource. The only caveat is that it will be more complicated for you. There are extra bubbles to deal with and more lines to true up. By the end, you'll have two pieces that you truly doubt the usefulness of. How can a center front piece need six extra length inches? It will work. You just need to have faith...and perhaps a glass of bracing champagne. 

Or, if that fails, tune back here next week. I'm planning a step-by-step princess seam FBA tutorial for large busts. The whole time I was doing mine, I was wishing someone else had told me what to expect. We'll make sure you're not as surprised! 

Original pieces on the left, my darling monsters on the right.


Once again, I'm not super impressed with By Hand London's directions. They definitely assume that the reader has dressmaking experience. For the box pleat, the instructions literally read: "Form the box pleat now." Which is great and all, unless you're a novice who hasn't formed a box pleat before! If you haven't, a quick Google should sort you out. 

As for the pattern itself, it was a breeze to sew up. It's not something I'd recommend to a beginner, thanks to the princess seams and instructional vagueness, but it's a fun little dress pattern. Elisalex is a very chic, modern design, which is what I'm coming to expect from BHL patterns. They definitely have a bead on what young sewists want to wear! 


The Details...

Things I Loved:
  • The fabric! Italian designer brocade. Just the words make me feel a swoon coming on!
  • The bodice! Once you fit them correctly, princess seams are so fun to sew up and so lovely on the body. 

Things I Changed:
  • Cut a smaller skirt, took in the side seams an additional four inches each. 
  • FBA to add six inches at the bust
  • Did a hand-picked metal zipper at the back. 

Things I Would Change, If I Made It Again:
  • Not much! Now that the fit is down and I've tamed the skirt panels, this is a fabulous pattern.

Notions & Fabric:
  • 18 inch metal zipper
  • Two yards of brocade - $48
  • One yard of white cotton shirting for the bodice lining - $6
  • Cut a US size 14 bodice, with an FBA, and a US size 10 skirt. 

Construction Time:
  • Including muslins, eight hours. 


Note: I've switched commenting formats from the clunky Blogger system, to the new and improved Disqus. Woohoo! It should be easy to navigate and loads of other great bloggers have already implemented it, but if you have any issues below, shoot me an email and let me know. 

Sunday, October 13, 2013

Miss Anna Roots For the Home Team


Happy Sunday, my dear chipmunks! Did you enjoy a weekend of hiding acorns and engaging in crime-solving adventures? I do hope so.

Here at Chez Fancy, our weekend plans were rather derailed. My dear professor and I were supposed to road trip up to Dallas, where my best friend lives. We were going to eat French pastries, drink German beer, and--best of all--visit the Texas State Fair. Alas, our weekend of fried delicacies (this year's winner: Fried Thanksgiving Dinner, for real real) and classic Americana was not meant to be. Instead, we stayed home to avoid biblical thunderstorms.

All was not lost though. As part of my travel prep, I'd made a pretty sweet dress!


Why, yes, I did make another Anna dress variant. Why, no, this isn't the last one planned.

This Anna sets herself apart from the pack, by virtue of the green-and-white polka dotted fabric she's made up in. It's a dreamy cotton voile that I bought last year from Fabric Mart for a song. It's also the perfect thing for a fair! There is nothing more American than eating fried Twinkies, while wearing polka dots. If we'd actually ended up going, the fair probably would have been hectic anyway, because of all the bald eagles soaring and star-spangled banners waving in my presence.

Apologies for the wrinkles! We went to brunch, before this photo outing and this fabric wrinkles easily. 


Doesn't this dress just scream "State Fair?" While I was trying to take pictures for this post, even the wind wanted in on the Americana action. Half of my pictures look like 90's Mariah Carey cover art. This dress breeds pop poses, it seems. Witness:

 Warning: "Fantasy" may be stuck in your head for days, after wearing this dress.

As for the pattern itself, well you've heard this spiel already. Anna dress + gathered skirt = bliss.

To change things up a bit, I used the slash neckline bodice variant, rather than my previous v-neck. Normally, I don't love high and wide necklines, but this one is surprisingly flattering. It's probably due to the visual balance, when paired with the bodice pleats. This bodice, it seems, just gets better and better.


My construction of this dress was, at least, different this time around. Instead of the usual facings, I cut a lining out of green cotton lawn and inserted that in the same manner prescribed by By Hand London themselves. After machine stitching it in around the neckline, I slip-stitched the arm holes and zipper seams closed by hand. I don't know what's been going on lately, but I am finally understanding the joy of hand-sewing. It's probably a phase that will pass, but I'm reveling in it for now.

The other major changes were my now-standard fixes: a gathered skirt, in-seam pockets, and hand-picked traditional zipper. Woohoo for more hand-sewing!


s

In the end, I have yet another Anna dress that I love. Honestly, I didn't think another garment could rival my adoration for the Austin Bats Anna dress, but after wearing this cheerful, swishy number around town today, there might be competition. Sam is especially partial to it, because I've inadvertently made a Baylor University dress. His alma mater (and current place of employment) sports the colors green and gold, which I don't often wear together, but donned for his enjoyment...

Sic 'em, Bears! 
Note: Siccing (th)'em is that odd hand signal I'm doing above. At football games, of which I've been to exactly one, the whole crowd waves their "bear claws" and yells "Sic 'em!" together. It's adorably weird. Though, I can't knock traditions, graduating myself from a school with some of the oddest.


 The details...

Things I Loved: 
  • The fabric! I'm crazy about these polka dots. 
  • The pattern is quickly becoming a real go-to for me, as you can tell.  
Things I Changed:
  • Added a  full lining. 
  • Added the lining after the zipper, so that the finish was prettier. 
  • Stay-stitched the neckline. For the love of Reveille, please stay-stitch your neckline! 
  • Added in-seam pockets, because...pockets. 
  • Switched the invisible zipper to a hand-picked zipper. If you're curious about this technique, I recommend Tasia's tutorial. 
Things I Would Change, If I Made It Again:
  • Nothing. After four times, this pattern and I are in love.

Notions & Fabric: 
  • 3 yards of green-and-white polka dot voile - $20
Construction Time:
  • Four cheerful hours


Monday, October 7, 2013

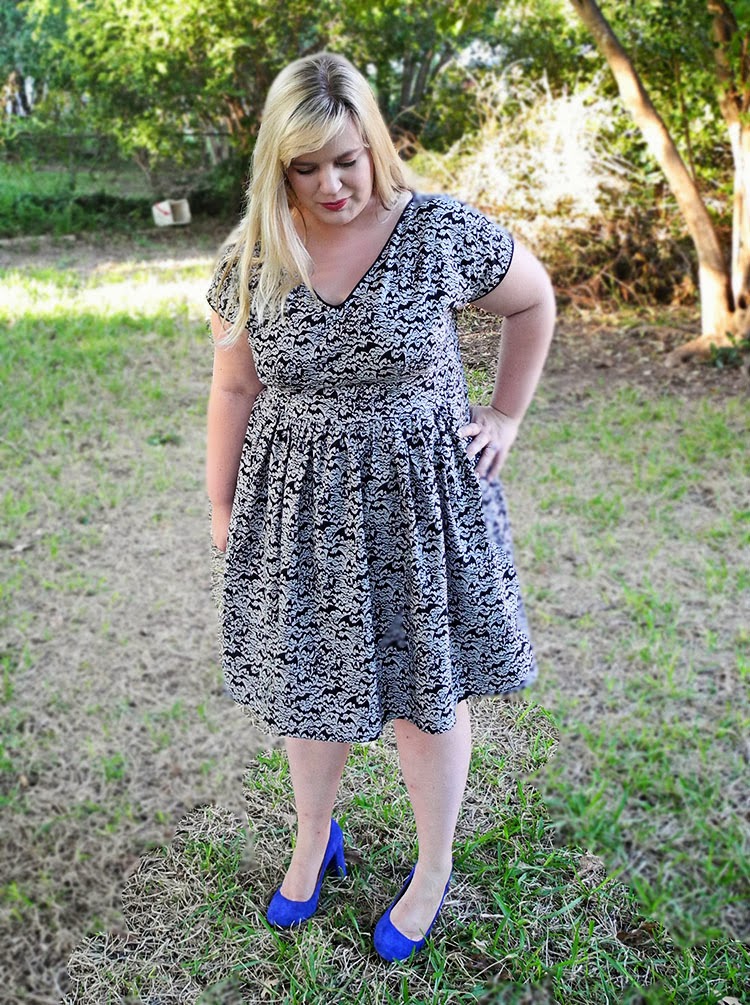
Miss Anna Goes A Bit Batty


Good evening, my dear ghouls. That most wonderful holiday of the year looms on the calendar, filling my head with tricks and treats and fun size Kit Kat bars. It's Halloween, y'all! 

Or, it will be in twenty-two days, anyway. I'm one for early preparations. I would say it's a Girl Scout thing, but I was only a Brownie for one year, until I dropped out because they made us sleep outside, where the bugs lived. Despite a general distrust of things that crawl, I live for this holiday. It has all the makings of a good time: costumes, free candy, and things flavored with pumpkin. There is nothing about Halloween that is not awesome. 

As proof of my love, I've made my first Halloween dress.

That's right, my first. Novelty fabrics, I will own you!


So, what's novel about this fabric? It looks like an abstract black print on grey fabric. Boring! Just because it's black and grey doesn't mean it's Halloween-themed, Mary. 

Well, if you get a little bit closer...


Oh sweet baby squash blossoms, those are bats. Black bats, masquerading from afar as squiggles on a grey background!

Yes, my dear ones, I made a dress out of bat fabric. When I saw this Alexander Henry print, from their Ghastlies line, it had to be mine. Not only am I from Austin, the bat capital of America, but they are my favorite animal. How could you not love a flying mammal that hangs upside down and eats mosquitoes? They are wonderful, ergo they deserve a dress. 


Since this fabric is quilting cotton, a heavier weight without so much drape, it needed a pattern that could handle a stiffer material. Enter the Anna Dress, of course.

For this version of Anna, I decided to pair it once again with a gathered dirndl skirt. The close fitting skirt of the original pattern would have been a disaster with this fabric, but the structured bodice was ideal. Besides, doesn't it seem appropriate that a Halloween dress is made with a Frankenpattern?


As far as pattern changes go, the dirndl was the biggest change. The only other things I did were to add black piping to the neckline and sleeves, then sub a hand-picked zipper for the prescribed invisible zipper. That's a change y'all will be seeing a lot of, I'm afraid. The finish of a hand-picked zip is just as clean as an invisible zip, but puts a lot more control in the hands of the sewist. I do so love control. 

Since the Anna dress uses facings, and my fabric was a bit thick for a lining, putting the piping in was more of an adventure than it usually is. In order to make the neck facing turn properly with the added weight, I tacked it down at the shoulders and at the point of the V. For the sleeve piping, I turned the hem in 1/2 inch, the hand stitched the piping in, followed by black bias tape to cover the inside exposed edges. 

Oooh! Piping!


So, there we have it, another Anna. This pattern is always a dream to sew up, as well as wear. There are two others cut out on my sewing table right now and I can't promise they'll be the last. This bodice is both lovely and practical! A true winner. 

The details...

Things I Loved: 
  • The fabric! It's covered in bats, darling. 
  • The pattern is quickly becoming a real go-to for me. I heartily recommend giving it a whirl. 
Things I Changed:
  • Added black piping, to create interest on the somewhat busy print of the dress. 
  • Under-stitched the facings.
  • Added facings after the zipper, so that the finish was prettier. 
  • Stay-stitched the neckline. For the love of Cthulhu, please stay-stitch your neckline! 
  • Added in-seam pockets, because...pockets. 
  • Switched the invisible zipper to a hand-picked zipper. If you're curious about this technique, I recommend Tasia's tutorial. 
Things I Would Change, If I Made It Again:
  • Nothing. After three times, this pattern and I are pretty in sync. 
Tricky Steps & Suggestions:
  • Turning faces can always be tricky, but under-stitching them goes a long way toward taming the wee little beasties. Secure them at the shoulder seam, by stitching in the ditch, and you're golden. 
Notions & Fabric: 
  • 3.5 yards of Alexander Henry's Ghastlie Bats - $30
Construction Time:
  • Five delightfully haunted hours


I would like to tell y'all that this dress will only be reserved for October, but that would be a lie! It's seasonally appropriate with a cozy orange cardigan, but the print is understated enough for other months. These bats will have longevity far past Halloween, I predict. If anyone dares give me the stink eye about them in springtime, well...

That's what real bats are for. 

Kidding. Of course. I'll tell them that I'm from Austin, a city that properly appreciates this noble species, and give them a few hard-hitting bat facts for their trouble. 

 The perfect dress for some twilight ghoul hunting! 


Saturday, September 28, 2013

Miss Anna Seizes Her Liberty


Happy Saturday, kittens! Most of my day has been spent watching college football on the couch in my pajamas, but the morning was certainly eventful. Sam and I attended one of our favorite weekend events, the Waco Downtown Farmers Market, where all manner of lovely things can be found: crepes, organic farm-raised meat, fresh tamales, frou frou coffee drinks, and Parisian macarons. It's a very international-meets-country start to the weekend and part of what I love about my new locale. When I find myself longing for the big city during the week, I think about the crepes awaiting me and my blues quickly disappear. 


So, what does one wear on such a perfect morning? A new dress, of course! Earlier this week, I put the finishing touches on another By Hand London Anna Dress. Or, a Franken-Anna, anyway. While I adore the bodice on my original Anna, I wasn't super crazy about the cut of the skirt. It's nice to have one out-of-the-ordinary dress for my closet, but I didn't want five more versions. Enter the dirndl! 

Instead of the gored original skirt, I paired the bodice of this Anna with a gathered rectangle skirt. The result is a lovely, flowy delight of a dress. Kimono sleeves! Pleated bodice! Gathered skirt! It's all that is good and right in the sewing world. 

Naturally, I didn't think of it myself. I knew it would work, because the lovely Roisin has already made a few of these. Her blog is an excellent source of sewing inspiration, as you can tell by my frequent linkage lately. 


For fabric, I used 3 meters of Liberty Tana Lawn that I bought off Ebay UK last year. It's a gray-and-brown floral on a black background, which makes it an ideal dress for fall. The name of the pattern is an utter mystery to me, despite ten minutes of solid Google searching, but it's gorgeous. Would we expect something else from Liberty? I can't wait to dress this lovely up with tights and boots!


In my mind, I flirted briefly with doing a full lining for this dress, instead of the prescribed facings. Once you try on a single-layer Liberty dress, however, it's hard to add a non-Liberty layer between your skin and it. So, I gave in. When it gets chilly, I'll throw on a slip with the dress and a cardigan. Since it's unlined, the dress is finished with black lawn facings and overlocked seams throughout.

While I do love this pattern, I have a few issues with By Hand London's instructions. They're wonderfully clear for beginners, but they skip some important construction steps as a result. After rethinking the way I did my first Anna dress, which was mostly by the book, I added a few steps to my process. My neckline was stay-stitched first thing, which kept the edges from warping as I worked, and the facings were added after the zipper instead of before. Additionally, I under-stitched the neckline seam to the facings, so that they turned more easily. In the end, the inside is much cleaner this time around.

 Invisible zipper!

 Facings! Wrinkled, because I wore this all day. Let's pretend I didn't tell you that, okay?


 Isn't it marvelous? To sum up: Liberty and Anna are a wonderful match, indeed.

The details...

Things I Loved: 
  • The fabric! Liberty is always a good idea. 
  • The neckline. A deep-V is such a fun shape to wear--comfortable, flirty, and perfect for my favorite antique cameo pendant. 
Things I Changed:
  • Under-stitched the facings.
  • Added facings after the zipper, so that the finish was prettier. 
  • Stay-stitched the neckline. 
  • Added in-seam pockets, because...pockets. 
Things I Would Change, If I Made It Again:
  • Widen the skirt. Liberty is pretty narrow, so if you don't want more than two pieces to the skirt, it's not the fullest dirndl. My next versions will be with wider fabric anyway, so I'll cut the skirt a few inches wider. 
Tricky Steps & Suggestions:
  • There is an invisible zipper, which can be tricky, if you're not used to them. There are quite a few great tutorials around the web, however, Sunni's being my personal favorite and the one that sold me on them. 
Notions & Fabric: 
  • 3 meters Liberty of London Tana Lawn - $45
  • 22-inch black invisible zipper
Construction Time:
  • Five blissful hours.


UP