Showing posts with label McCall's 6696. Show all posts

Friday, February 6, 2015

Miss Clara Predicts an Early Spring: McCall's 6696


Hello, lovelies! Perhaps you thought that, with the end of 1000 Shirtdresses, I would be finished with McCall's 6696. However, spring looms in Texas. That means the lighter, brighter fabrics in my stash are demanding buttons and collars of their own. While I do have many other things on the docket, I made two shirtdresses in late January, especially for those warmer months: one floral and one plaid. Even better, I finally photographed one of them! 

This pastel cotton lawn has been in my stash for five or six years. With Liberty-like softness and all those pretty purple flowers, it's ideal for a sweet, springy shirtdress. (God, that's a lot of alliteration. Forgive me, friends.) Unfortunately, it was also really, really narrow. With four-and-half yards, I was just able to squeak a sleeveless 6696 out of it. 


After five previous iterations of this pattern, there shouldn't be more to say about it. However, I went for a different finishing route with this one. After all that sitting around in a closet, this particular fabric deserved extra flourish. With such a dainty print, why not throw in a few pretty techniques, as well? 

Instead of my usual shirtdress methodology of Topsitching All The Things, I instead hand-sewed all the details. The button bands, waistband, yoke, and hem were secured in place, using simple slip stitch. Meanwhile, the armholes were finished with self-bias tape and a catch-stitch. It all made for a beautiful, clean finish. Woohoo for unnecessary attention to details! 

One certain detail really makes me swoon over this dress, however. Instead of picking clear buttons, or contrasting ones, I covered eleven half-inch buttons with the same floral lawn. Sure, they blend in in these photos, but they add a lovely, feminine touch, in person. My fingertips hurt for two days afterwards, but it was worth it! Oh, sewing...


There's not much more to say about this dress, dear ones. The only fit change I made was to raise the armholes another half-inch. So interesting, no? In the end, this is a fabulous dress for spring. The colors come off a little washed out, in the winter light of these photos, but they're quite pretty in real life. It's going to be cute with a coordinated cardigan and espadrilles. 

Best of all? Next week, our temperatures hover around 70 degrees. It's always nice to actually wear the dress you've recently spent five hours hand sewing! 


Sunday, December 14, 2014

Miss Clara and the Seasonally Inappropriate Christmas Dress: McCall's 6696


When planning a dress for the holidays, a certain aesthetic comes to mind. This is the season for plaid taffetta and long-sleeved wool sheaths. This is, most assuredly, not the season for lightweight poplin printed with hot pink roses. No Northern Hemisphere woman in her right mind would sew such a thing right now. 

Except, apparently, me.

I couldn't help myself. While musing on Christmas dresses, this Liberty cotton lodged itself in my mind and wouldn't budge. I've hoarded four yards of this poplin, in the pink Carline print, for years. Not only is this my favorite Liberty print, but it's also maddeningly discontinued. I have another two yards in blue, awaiting the perfect blouse pattern, and an Ebay alert set up for the red colorway. Carline is my fabric white whale. 

This particular length was bought with a shirtdress in mind. Of course. Since then, McCall's 6696 has come into my life and my collar-making skills have improved tenfold. Not only would this be an ideal Christmas shirtdress, I decided, but I probably wouldn't ruin it in the process. Score! It was time for Carline to have her day. 


True to form, I couldn't leave well enough alone. Heaven forbid, I take the easy way and make an unaltered, perfect-as-she-is 6696. That would be too easy, too stress-free! Instead, I decided to turn my beloved shirtdress pattern into a half-shirtdress pattern. I would use the bodice of 6696, paired with a straight waistband, full, gathered skirt, and side zip closure. 

Despite my dramatics, this is actually a straight-forward pattern change. There was some basting involved, to get the waistband just right, but otherwise, it's a simple matter of planning. Let's walk through it, shall we? Note: I didn't set out to make this a tutorial, but rather a guideline of my process, so this isn't a fully photographed explanation. Writing it out, the instructions ballooned in size. I explain everything thoroughly, however, and photographed the two weird parts. If you have any questions, leave them in the comment section!


1. Cut both skirt pieces on the fold. I decided to use the original skirt pieces from 6696, but gather them like a traditional dirndl skirt. You could, similarly, cut two rectangles for a real dirndl skirt, as in Gertie's tutorial. Either way, since we're moving from a front button closure to a side zip, you're going to cut those skirt pieces on the fold, so that you don't have a seam running down the front.

2. Trace a new button band. For a half-shirtdress, you only want a button band the length of your bodice pieces. So, measure the length of your bodice center fronts, then mark that length on your button band piece. Trace that portion of your band and--voila!--new bands.

3. Measure your waistband. Your impulse for this project will be to add the length of your button band to your original waistband, to create a slightly longer one. This is actually not the way to go. Full shirtdresses have more ease around the waist than a half-shirtdress, to prevent button gaping. How much ease you want at the waist will be up to you (standard is 1'', but I prefer 1/2''), but it's likely that 6696's waistband will work as-is, without lengthening. Put the pattern piece around your natural waist and try it out! Does it feel comfortable, when you sit? Is it secure enough to add definition? Add or subtract length, based on this decision, and remember to factor in a 5/8'' seam allowance on each end.

4. Mark side seams and centers of waistband. Because we're gathering our skirts in, you'll need to mark your center front, center back, and side seams, so that your skirt is even all around. Begin by adding your seam lines to each end at 5/8'', then measure in from one end at 1/4th the length (Center Front), 1/2 the length (Side), and 3/4th the length (Center Back) between those lines.

5. (Optional) Reduce gathers on back bodice. While the blousing in the back of this dress doesn't bother me, you may want to streamline the back in this version. To do so, simply trace the back bodice piece, then remove your desired amount from between the center gathering marks, in a vertical strip from top-to-bottom. I recommend leaving some gathers in, for ease of wearing, but removing one or two inches from the pattern piece will lessen that blousing quite a bit.

6. Leave the left side bodice open, 3.5 inches from top. We're going to insert an invisible zipper on the left side, so construct your bodice normally, but only sew down part of that side seam. There's no exact science to this, but it should be enough that you'll be able to get into your dress comfortably! Remember to back-stitch, at each end. Construct and finish the rest of your bodice, as usual. 

The left side of my bodice, after leaving it open. 

7. Add button bands, then overlap the right bodice onto the left bodice. After sewing your bodice as you would normally, attach your button bands! Once you have them on and top-stitched, put the right bodice over the left bodice, lining up the bands, then baste them into place. Finish both the collar and the sleeves now. Leave the buttons and buttonholes until the end of dress construction, so you can accurately mark placement, with the skirt attached.

8. Sew the waistband to the bodice. Begin pinning with the left side, still leaving that open, and pin your waistband to the bodice. Align the centers of your front and back bodice, with the marks on your waistband, then baste them together. If you're happy after a fit-check, then sew everything in permanently! Note: you may find that you want to take the waistband in further at this step, or even raise it a little. The proportions of a half-shirtdress are just a bit different from a full, so these changes are natural. 

Overlapped bodice bands attached to the waistband. 

9. Sew the right skirt seam. We're still leaving that left side open, so sew and finish the right skirt seam only.

10. Gather and attach the skirt. Sew two rows of gathering stitches, at 1/4 inch and 1/2 inch, around the entirety of the skirt waistline. Once you've sewn, push along these lines and create your gathers. Match the skirt center front, center back, and side seams to those of your waistband, and even out the gathers across the skirt. Stitch into place. 

11. Insert an invisible zipper. Finish the entire left side of your dress, from bodice to skirt, using your preferred finishing method. (I serged everything, for simplicity's sake.) Then, insert the invisible zipper into the left side, with the top zipper stop aligning with your fabric opening. It's just like sewing an invisible zipper in a skirt or a dress, but the top zipper tape is going into an existing seam. Conversely, you can choose to leave the top left side entirely open beforehand, closing it only after your zipper installation. Either way, make sure your waistbands line up, and have at it!

Resulting invisible side zipper and a peek at my light pink bias tape armscye finish!


12. Sew the left skirt seam. Once your invisible zipper is in place, sew the remaining skirt side seam, below the zipper. Secure the bottom zipper tape into this seam, with a few hand stitches.

13. Buttons and hem. Add your buttonholes, buttons, and hem, as usual!

14. Dance a jig, in your new half-shirtdress. 


Of course, you could also just use an existing half-shirtdress pattern. There's the new wrapped half-shirtdress from McCall's, M7081, and the Lisette Traveler Dress from Simplicity. I didn't use either of these, because the McCall's was just published last week and the Traveler doesn't have a traditional collar construction, which drives me crazy. I figured, the 6696 already fits in the bodice, so why not go with the one I already love? A good design alteration is creatively exhilarating, anyhow!

It's okay to just nod at me, as if I've gone mad. You should use an existing pattern, if you've got one stashed away. 

Apart from the construction techniques above, there are a few little extras in this dress. As is my wont, everything is top-stitched, including the button bands, collar, collar stand, and the waistband. Not only does it cut down on the hand-stitching, but it adds a bit of definition to the busy floral pattern. The armscyes are finished with light pink single-fold bias tape, which goes with the palette nicely. I was going to make self-fabric tape, but couldn't bring myself to waste the Carline. I actually have just enough of this fabric leftover to make a sleeveless blouse. Joy!

The buttons on this lovely are jade green plastic, from Hancock's, and match the green of the rose leaves exactly. Honestly, y'all, as much as I love Carline, those buttons might be my favorite part of this dress. They glow like little emeralds against the rose pattern, don't they?

Of course, I'm wearing this dress with my favorite emerald cardigan right now. It's been pretty mild lately, but things are going to turn chillier this week! We're actually headed to New Orleans next weekend, to spend the holiday week (and our first anniversary!) there with my family. It's not a Danielson Family Christmas, unless we're in some far flung location, eating Chinese food and using a coat stand as a tree. What can I say? We're heathens, the lot of us. 


Thursday, November 6, 2014

Full Bust Adjustment on a Darted Bodice

Good afternoon, lovelies! As you may have noticed, it's been a bit quiet around here lately. Between traveling, writing on a deadline, and unexpected (though beloved) visitors, my free time has been greatly reduced. I'm hoping to catch back up on the Autumn of 1000 Shirtdresses over the next week, but I also am considering bumping the challenge due date back. Considering we're going to into the holiday season, I can't be the only one warring with a busy schedule! 

However, today and tomorrow, I'm focusing on bust adjustments. This is one of those areas where I'm pretty well versed in some techniques, but have zero experience with others. Since I usually just sew for myself, I have done innumerable full bust adjustments, but never even sniffed around a small bust adjustment. To that end, tomorrow, I'm going to round up links to well-vetted and helpful bust adjustments, including techniques I don't have personal familiarity with. Today, however, I thought I'd share my own FBA for McCall's 6696. 

This adjustment is the most basic of FBAs, for a two-dart bodice. If you are using any pattern with a bust and waist dart, this exact alteration will also work for you! There are more complicated FBA techniques, as almost no problem in sewing has just one answer, but this is the tried-and-true method I usually begin with. 


First off, who needs an FBA? It's going to depend on the pattern you're using, but most Big 4 patterns are drafted using a B-cup bodice and it's rare that Indies are drafted larger than C-cups. If your bra size falls outside this range, then an FBA is for you! Even if your measurements are exactly identical to those on the pattern envelope, chances are weird fitting issues will crop up with a large cup size. It's astounding the number of these issues a good FBA can fix, from floppy shoulders to gaping button bands. Today, we're going to walk through the most basic of FBAs, for a two-dart bodice, but virtually every pattern design can be adapted for large cup sizes.

Before we start the adjustments, however, let's pick a pattern size. McCall's 6696 is a classic two-dart shirtdress pattern with multiple cup sizes. All of the Big 4 pattern companies have introduced pattern lines with multiple cup sizes, which is great because it does a lot of the FBA work for us! This particular pattern goes up to a D cup, which means I still need some room to accommodate my ample 36E bosom.

This pattern goes up to a size 24, or bust measurement of 46 inches (47 for the D-cup piece). It's tempting to look at a pattern size chart and pick based on your usual bust measurement, but that way danger lies. If I made a size 24, it would be a gaping mess everywhere but my girls! Instead, the best method is to choose a bodice based on your high bust measurement.

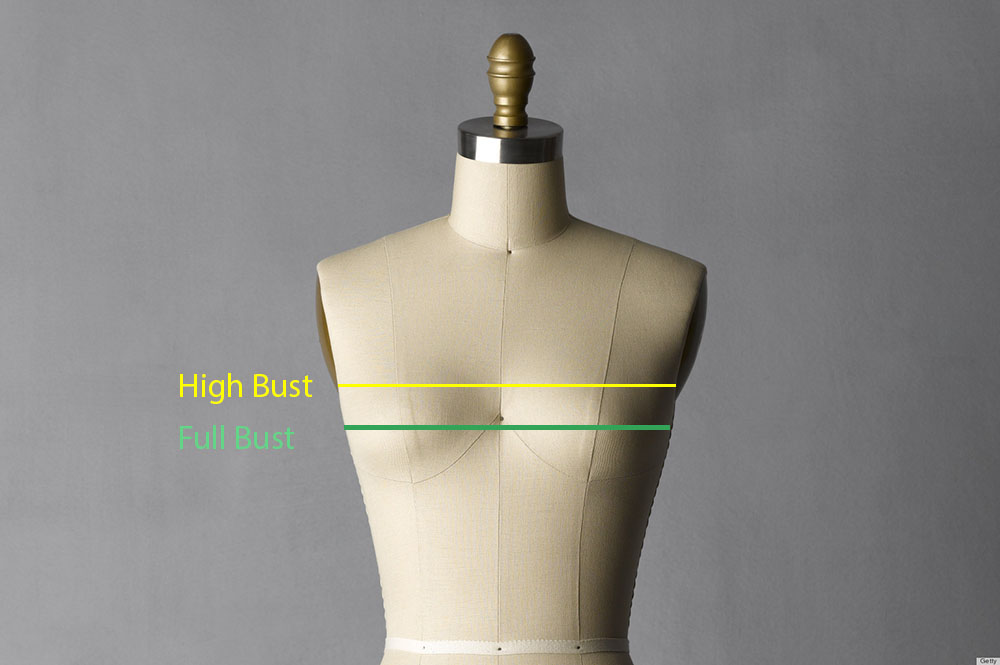
High Bust vs Full Bust

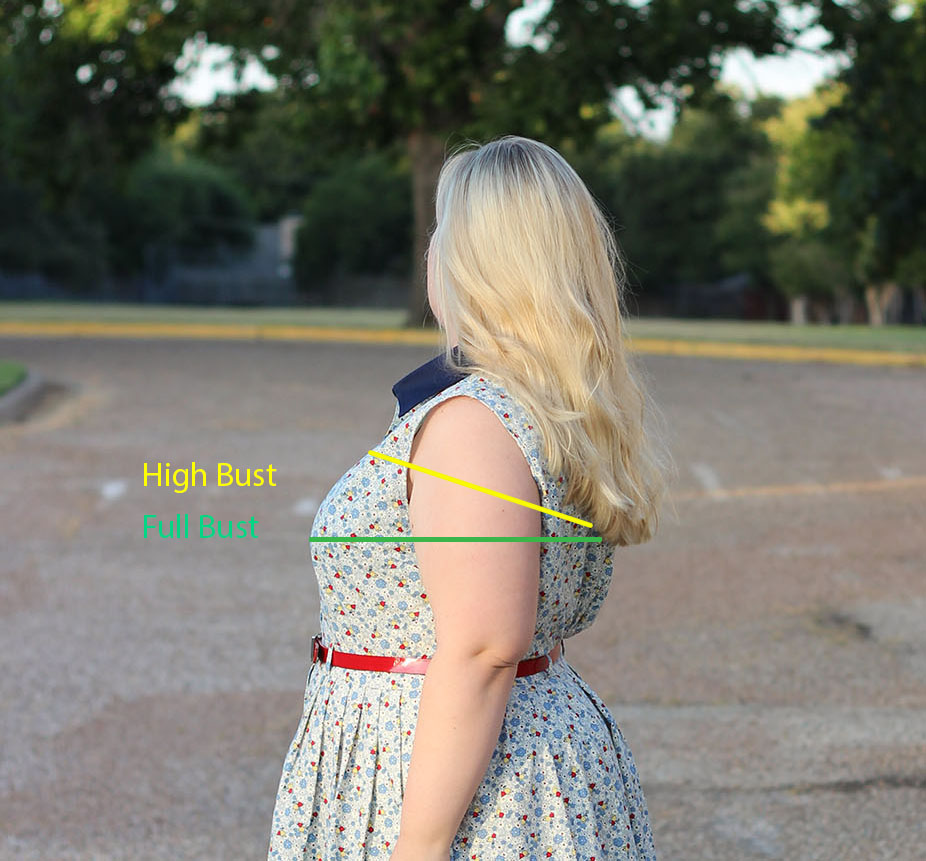
Mary - High Bust Full Bust

In a well-fitting bra, measure yourself all the way around the very top of your bust line, under your arms and over the beginning of your décolletage. That's your high bust! Now, measure around the fullest part of your bust line. Tada! That's--surprise, surprise--your full bust.

If you're a large cupped woman, these two numbers will be pretty different. My own measurements are a high bust of 41 inches and a full bust of 46 inches, which lines up with my 36E bra size. (Conventional wisdom states that every cup size is an extra half-inch measurement, though you may find this doesn't hold true for you, depending on fit preference.) Above, I've marked my own high bust and full bust, in a side profile picture. See how different those two parts of my bust are? If I pick a size with my high bust measurement, I'm between the size 18 and size 20 bodice, rather than our original size 24. Since my shoulders are wider than average and my waist is a solid size 20, that's the size I usually choose to perform an FBA on.

Note: You may have to grade between sizes at the waist and hip, depending on your proportions and measurements. It's not rare at all to need a size 20 bodice with an FBA, then a size 24 elsewhere. Women, no matter what fashion tells us, are not a standardized shape. That's why we sew, right? The important thing here is getting the right size upper bodice base for your shoulders and upper chest. You can easily grade out to other sizes, for your waist and hips.

Now, let's adjust!

Preparations:
Step One

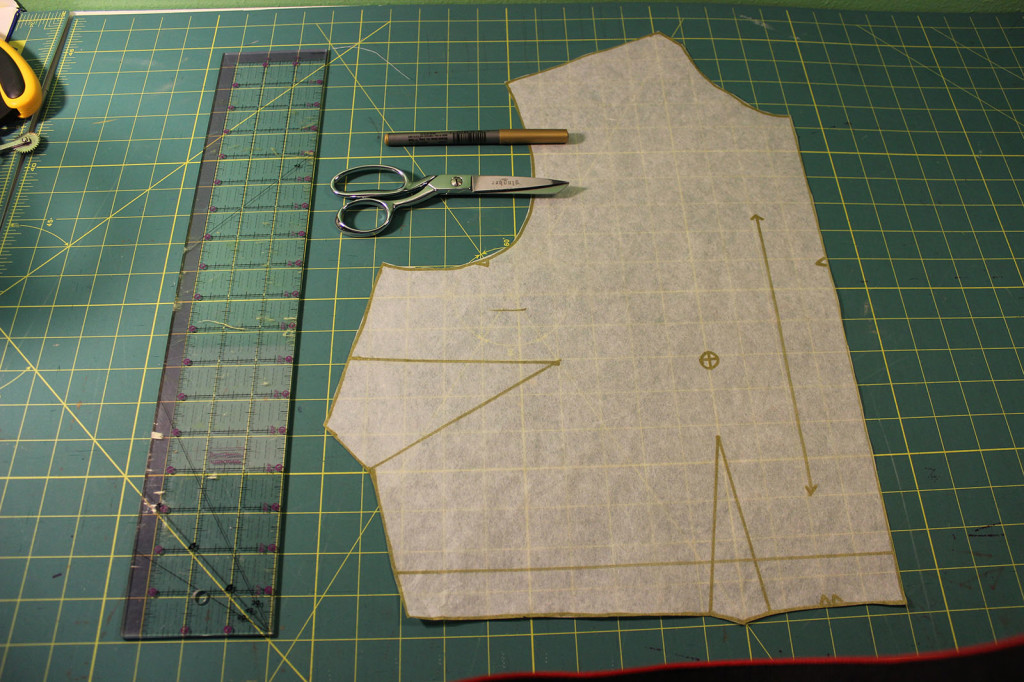
To get started we're going to need a few materials.
  • Your pattern! Instead of using the original tissue pattern, I highly recommend tracing your pattern onto a more durable type of paper. We're going to be slashing and spreading this baby, after all. Tissue paper is just too flimsy to handle that workmanship! Besides, if you end up wanting to change the fit, it's nice to not have irrevocably messed up the original bodice. Personally, I use Swedish Tracing Paper, which is not only easy to trace on, but sewable for quick fitting checks. Bee Paper is another excellent, very hearty choice. 
  • A clear ruler!
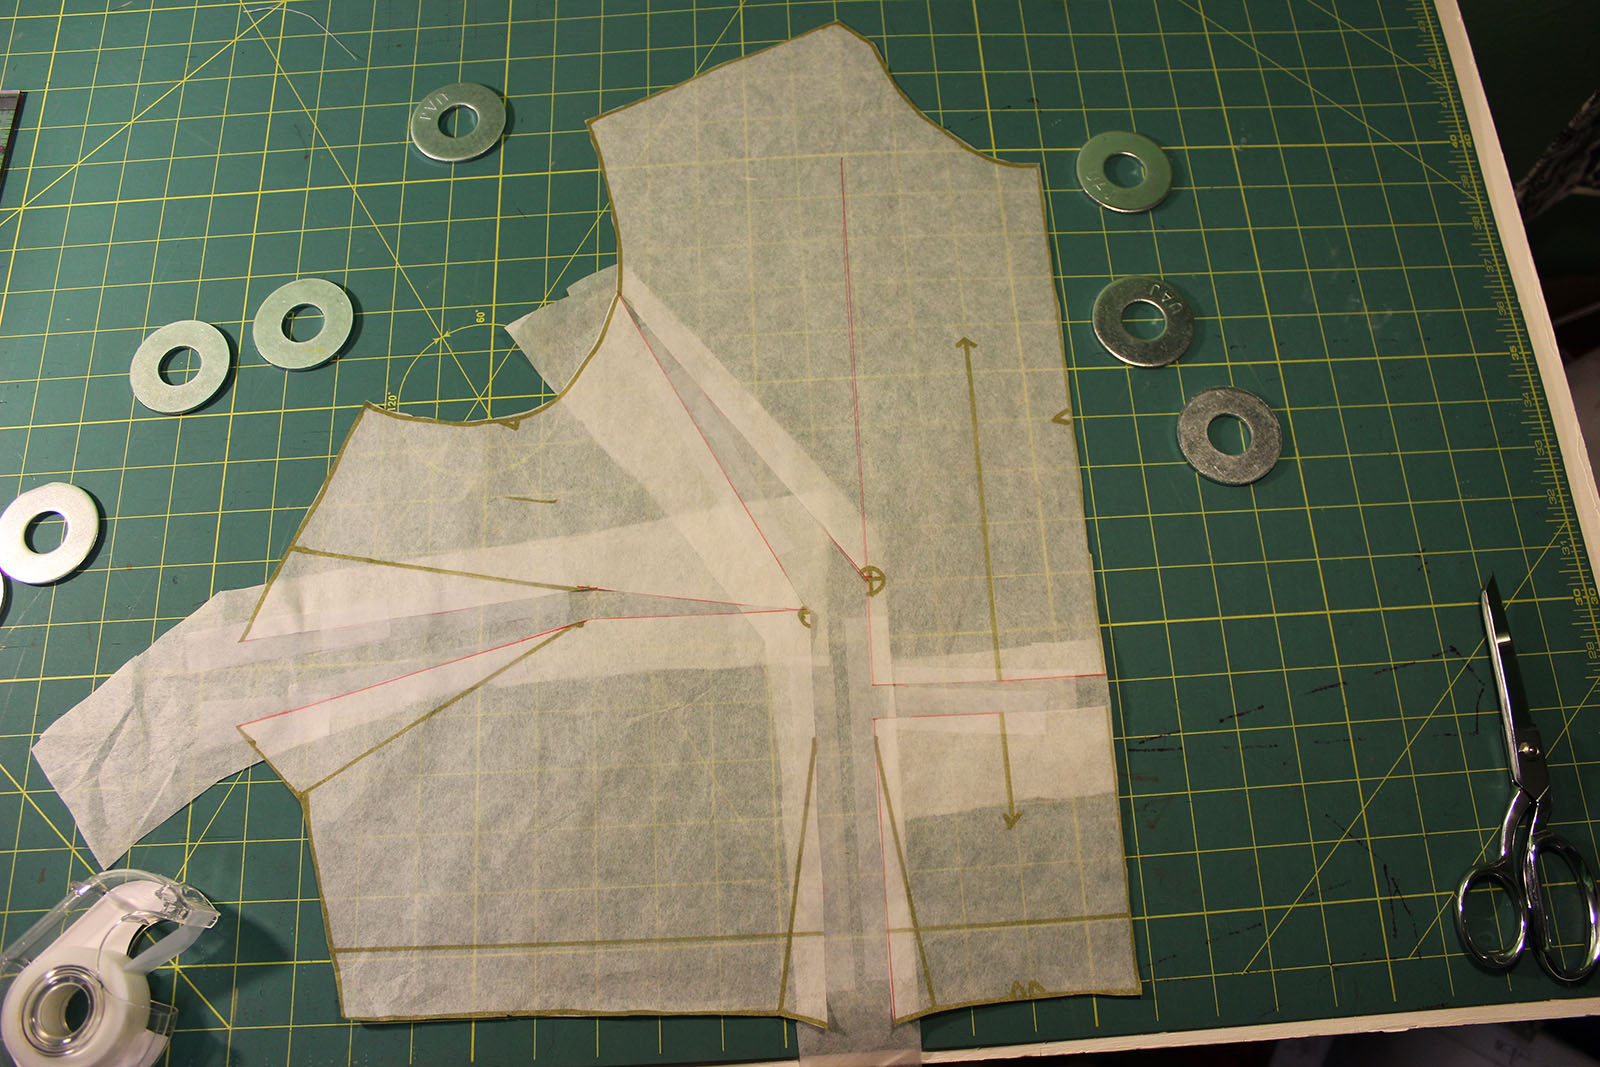
  • Pattern weights! I use large metal washers, which are both weighty and have slim profiles that make cutting around them a breeze.
  • A sharpie or pen!
  • Scissors!
  • Tape!
When you trace off your pattern, be sure to transfer all pattern markings, especially your horizontal lengthen/shorten line and the pattern's bust apex. We'll be using both of those markings to make our cuts in the pattern.

Step One: 

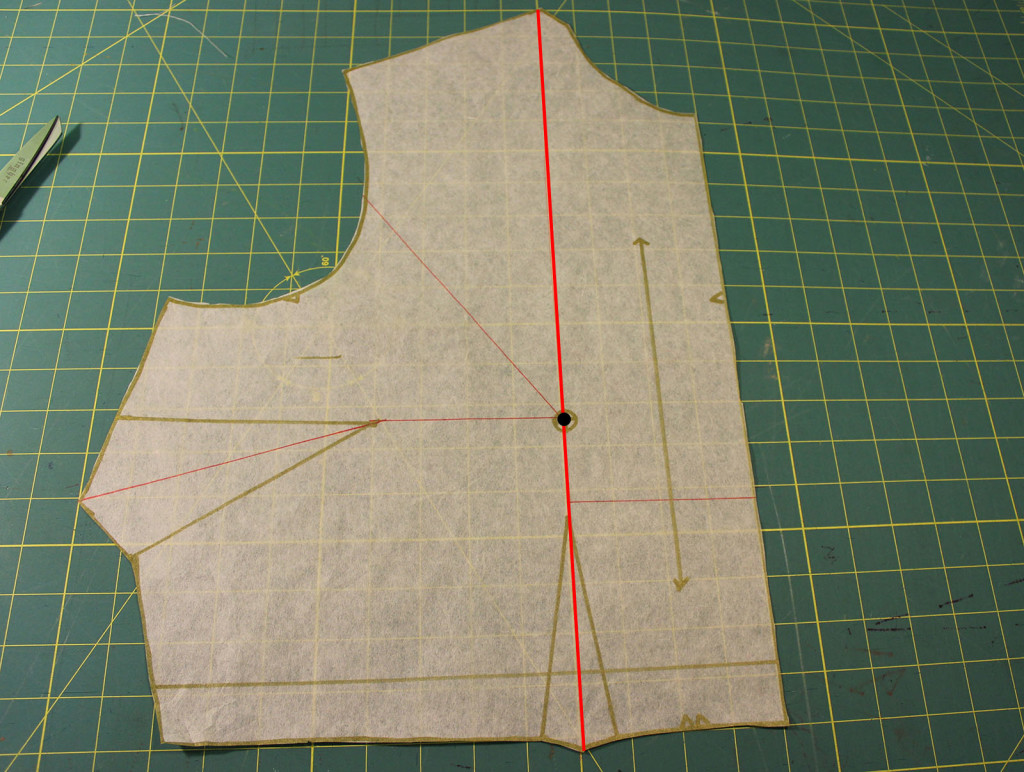
The goal of an FBA is to add fullness to your pattern piece, without sacrificing the fit at your shoulders and waist. To do that, we're going to draw a few lines on our pattern, then cut them to specific points, so that the piece only gets larger where we want! Are you ready? Grab that sharpie, my dear. (Note: Because my own markings were faint, for teaching purposes, I will be showing you this process with bright computerized lines, to make it easier for us all!)


Step Two

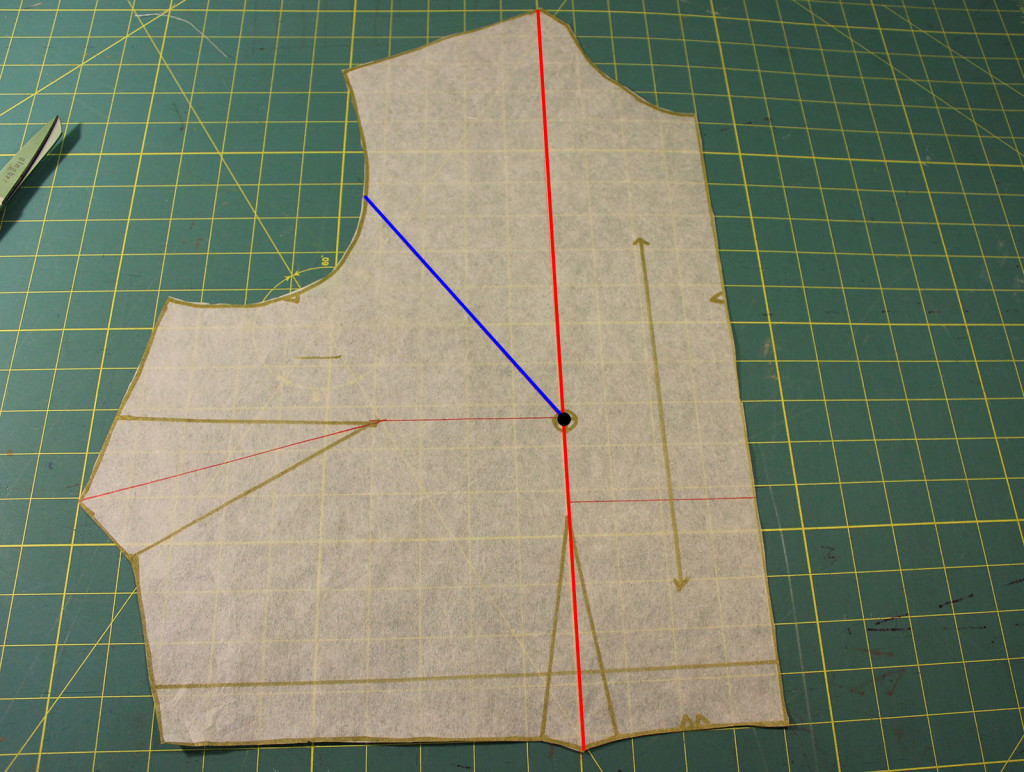
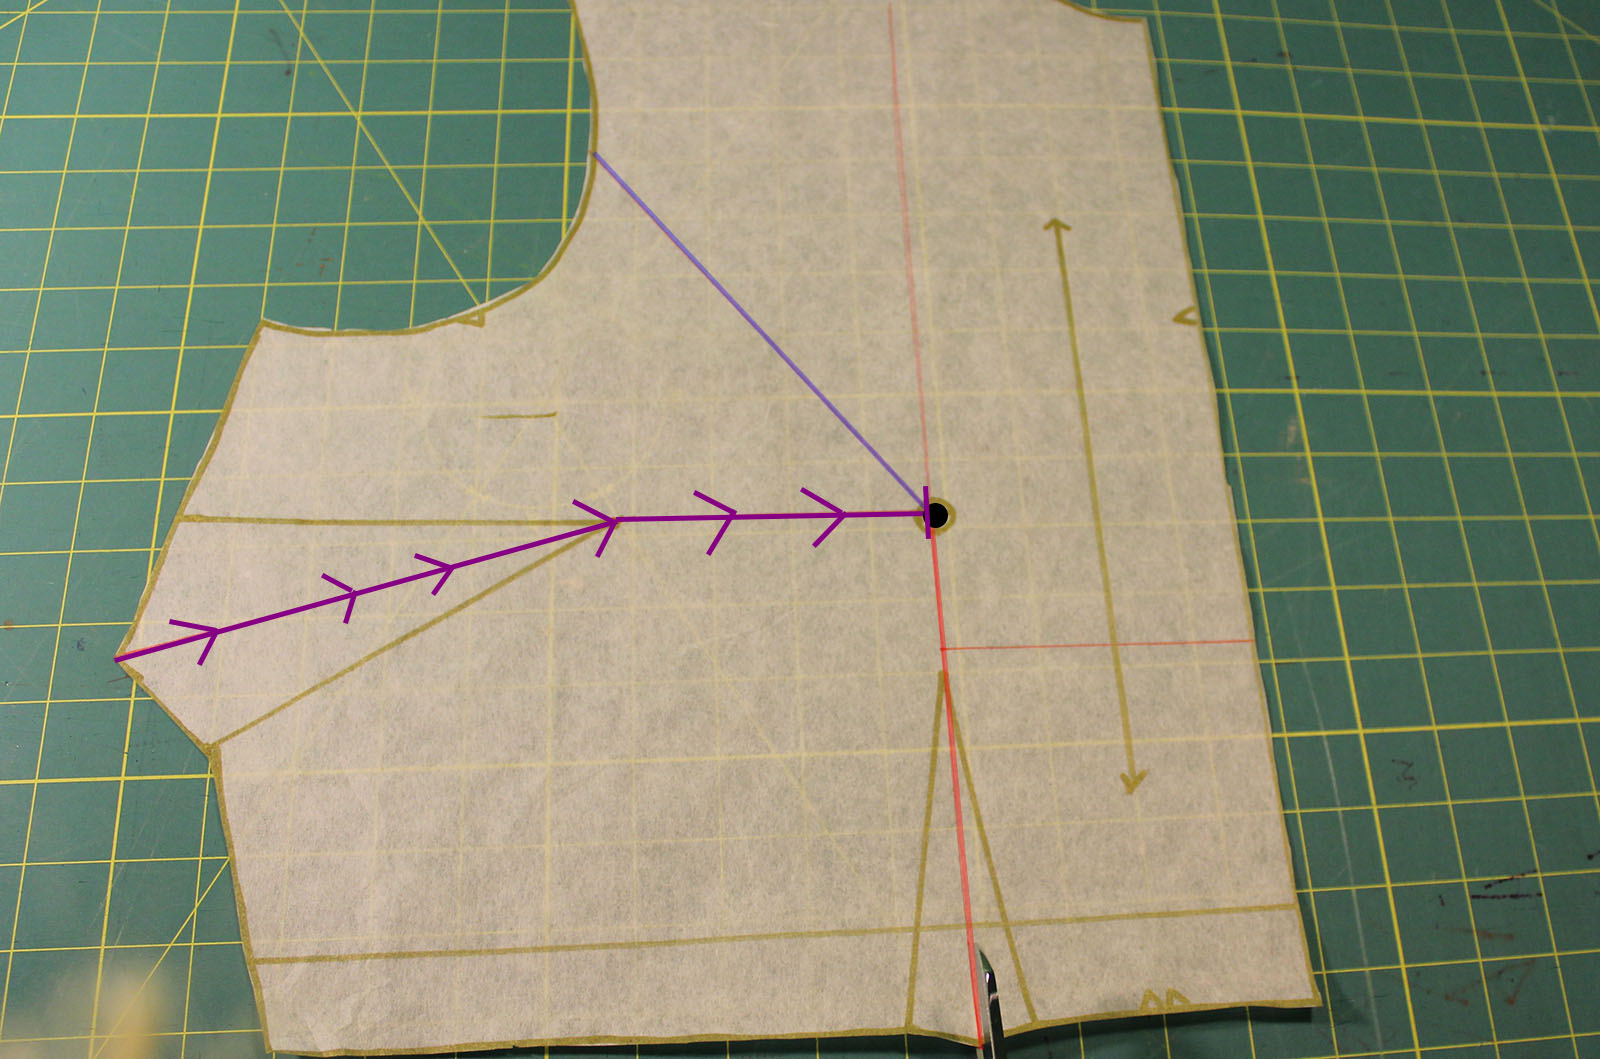
First off, draw a straight line through the middle of your waist dart (that one on the bottom) up to the pattern's shoulder, through the bust apex point. Above, you'll see my black bust apex and this first line in bold, bright red.

Step Two:


Step Three

Now, draw Line #2 from your bust point out to your armscye, about 1/3 of the way down from the shoulder. (Shown above in bright blue.) The reason we only go 1/3 of the way down the armscye is to prevent over-distortion of our armhole, which would give us too much blousing on the side.

Step Three: 

Step Four

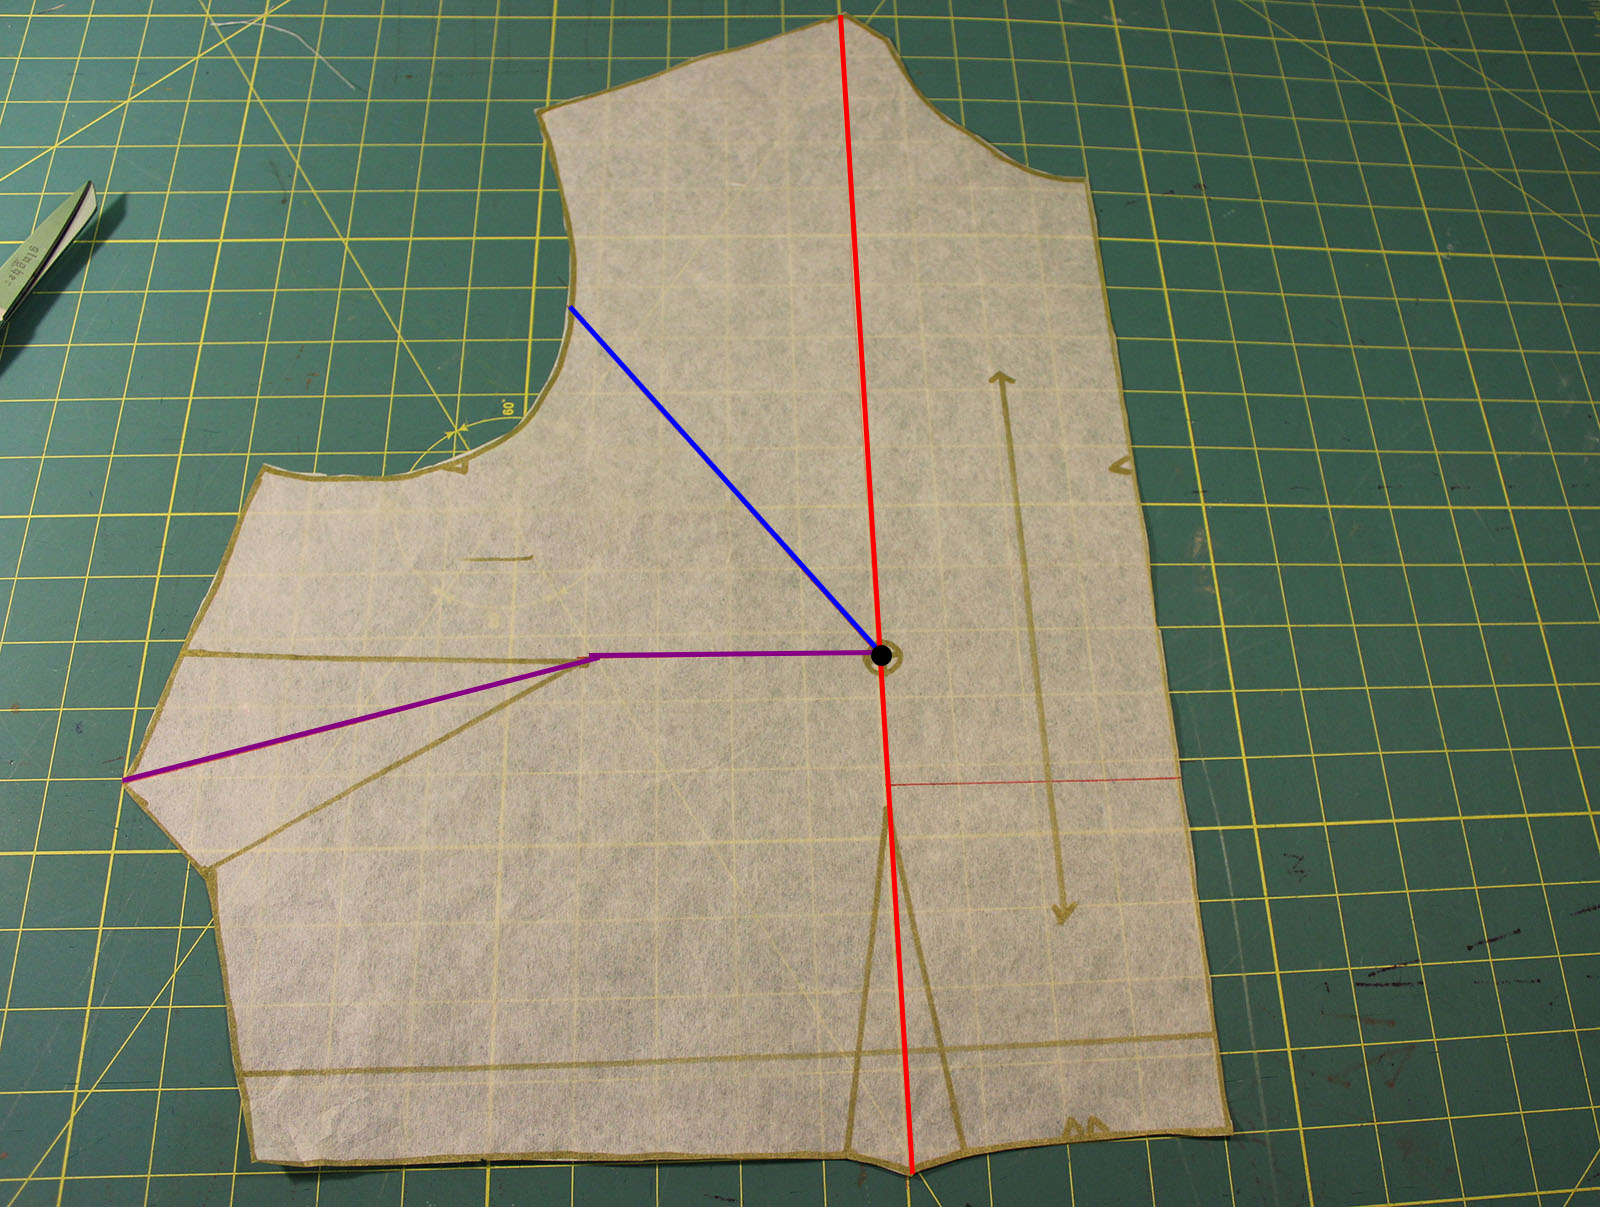
Next up, we're going to draw a line through our side bust dart to the bust apex. There are two main types of side bust darts you'll encounter: those positioned horizontally to an apex and those which angle up. For both types of dart, we draw Line #3 from the middle dart edge, through the dart tip, over to the bust point. If you're working with a horizontal dart, this will be a perfectly straight line. How easy! If you have an angled dart, as I do, there will be a hinge in your line like my purple one above.

Step Four:

Step Five

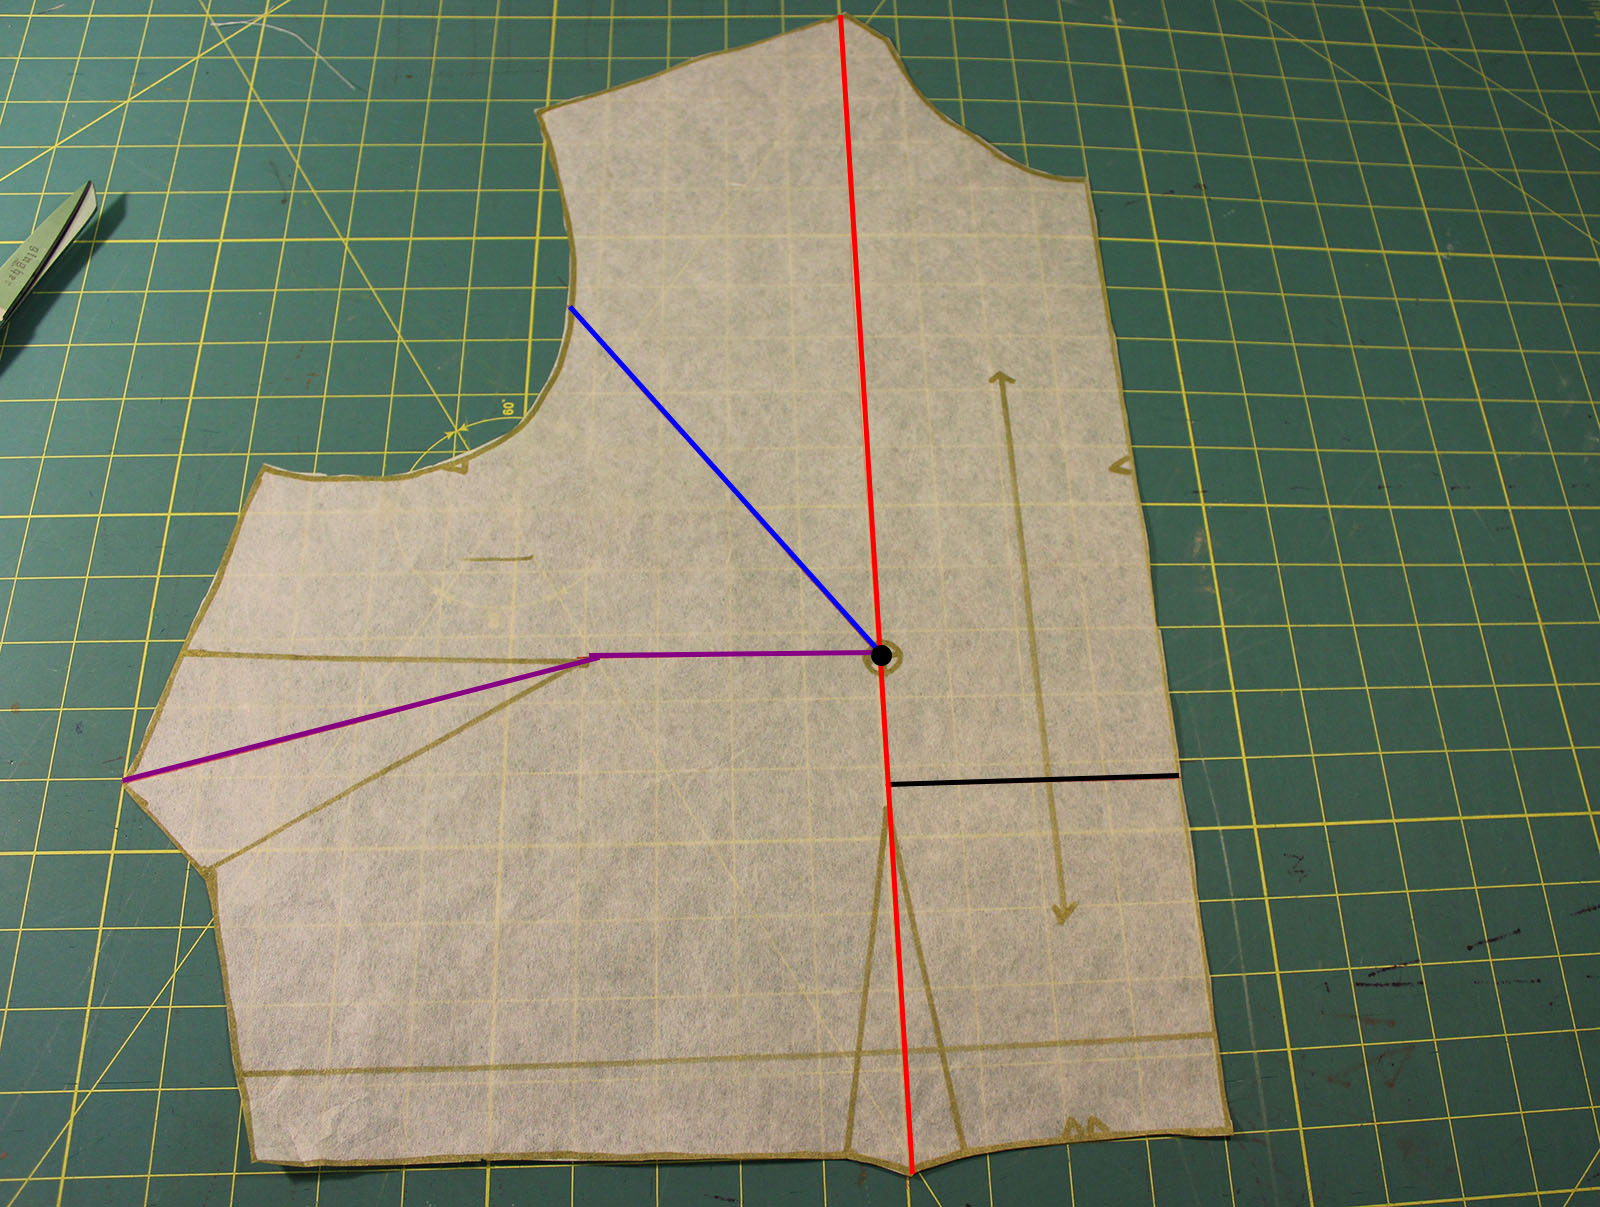
The final line we're going to draw is an easy one. From your center front, draw a straight horizontal line to Line #1, just above where your waist dart ends. I've done this in black above!

Woohoo! All your FBA lines are drawn! Not so hard, right? Now, onto the fun cutting parts...

Step Five: 

Step Six

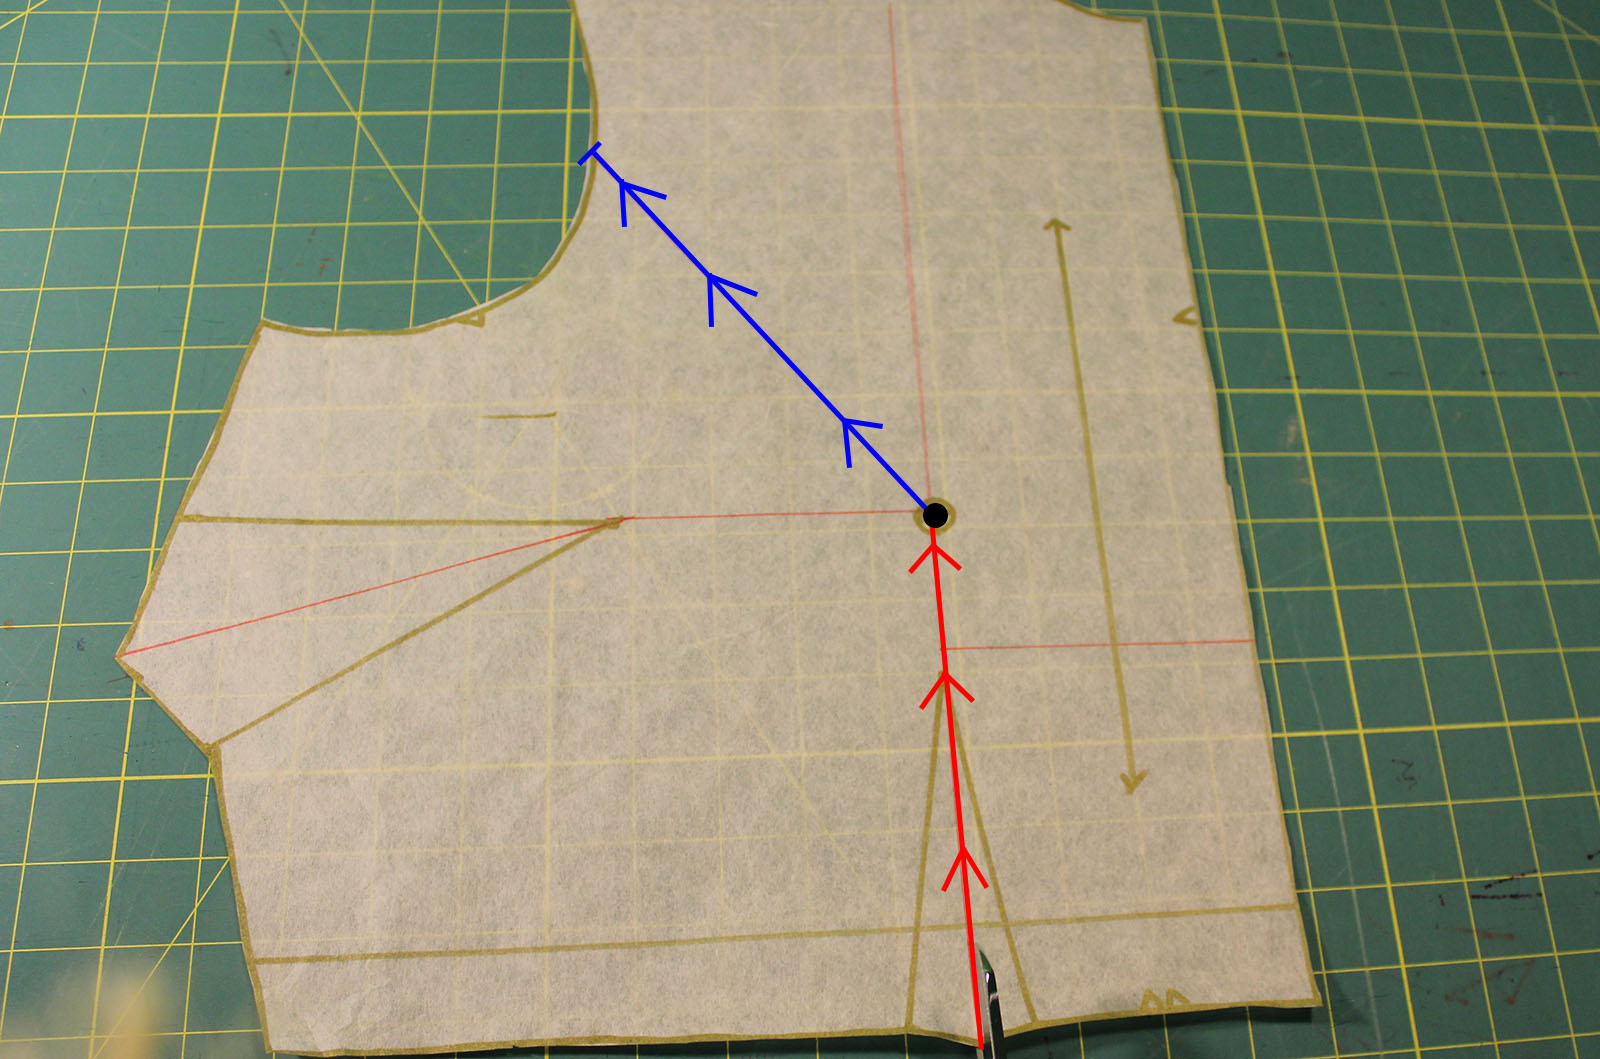
For our first cut, we're going to go up through Line #1 to the bust point, then pivot right there and continue along Line # 2 to your armscye. At the end of Line #2, stop cutting just before the line ends, leaving a small bit of line left intact (about 1/8 inch). We don't want to cut our pattern piece in two, just make it mobile enough that we can spread it out a bit. Leaving this little bit left gives us a "hinge," to move the bodice around.

Step Six:

Step Seven

For our next cut, we're going to cut along Line #3, starting at the dart side and stopping again just before the bust apex, leaving another hinge. See how you can now spread your bodice pieces out quite a bit? The step below shows our new pattern piece, complete with hinges and cuts!

Brief Interlude of Math

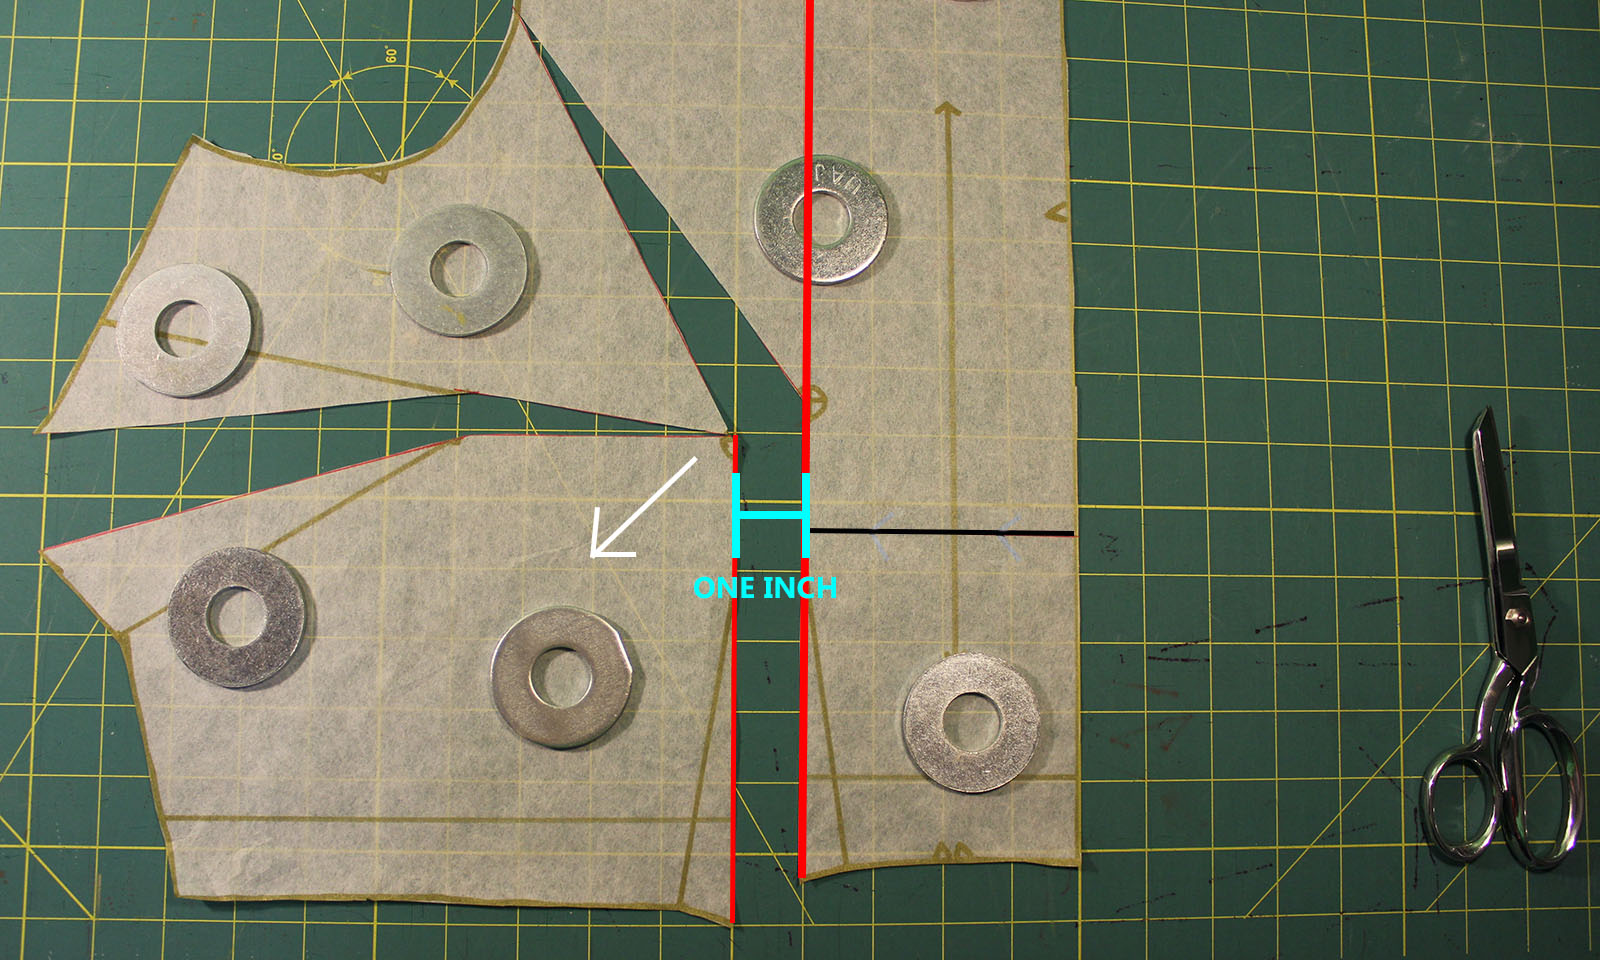
Now that your pattern piece is all hinged, we can add in the fullness needed to compensate for our full bust measurement. How  much extra room do you need, however? There are a few ways to determine how much extra fullness you need, but I go with the simplest version. How much difference is between your Full Bust and the stated Bust measurement on the pattern size? Since I'm using a Size 20, D-cup pattern piece, there is a two inch difference between my measurements and those of the pattern size. (Pattern's body measurement: 44 inches; My full bust: 46 inches) That means I need to add an extra two inches to the bodice pattern! Easy, right?

Since a bodice pattern piece is only half of a full bodice, however, this means I'm making a 1-inch FBA.

2 extra inches needed ÷ 2 bodice halves = 1 inch FBA (Extra Room Needed ÷ 2 Bodice Halves = FBA width)

Note: For some multi-cup-size patterns, the stated body measurement for larger cup sizes may not be available. To combat that, subtract your desired ease from the pattern piece's final measurement, which is always found on the printed pattern. For me, on McCall's 6696, I wanted about two inches of ease in the front bodice.

Now, let's start spreading!

Step Seven:

Step Nine - a

The extra fullness we're adding in gets directly added to Line #1, the bright red one that went up from our waist dart. To do this, secure the center front of your pattern piece, then spread your hinged lower bodice down and to the left. Being careful to keep the slash along Line #1 straight, spread your pattern piece out until there is one inch* separating the split Line #1.

See how your dart and armscye have also moved to accommodate your new Line #1? That's exactly what we want. Now, make sure every part is laying flat and your split Line #1 is still straight, with an inch separating it all the way down, then put pattern weights all over the place!

*Use the measurement you got from our Math Interlude. If you're doing a 2-inch FBA, spread it 2 inches, and so forth. 

Step Eight:

Step Nine

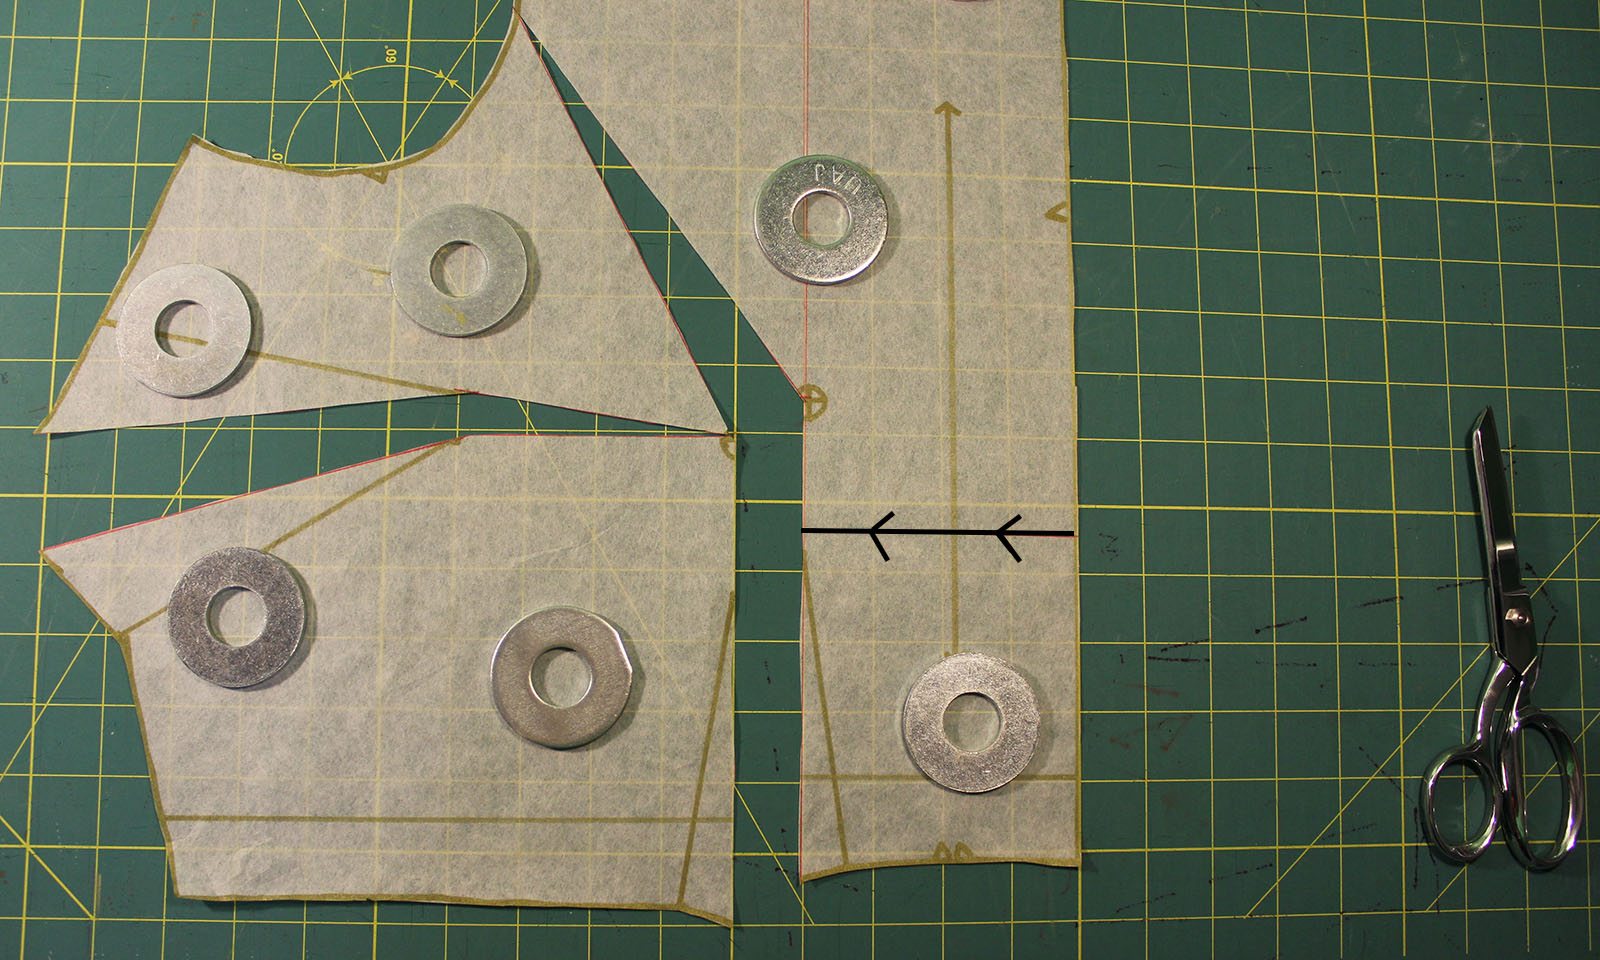
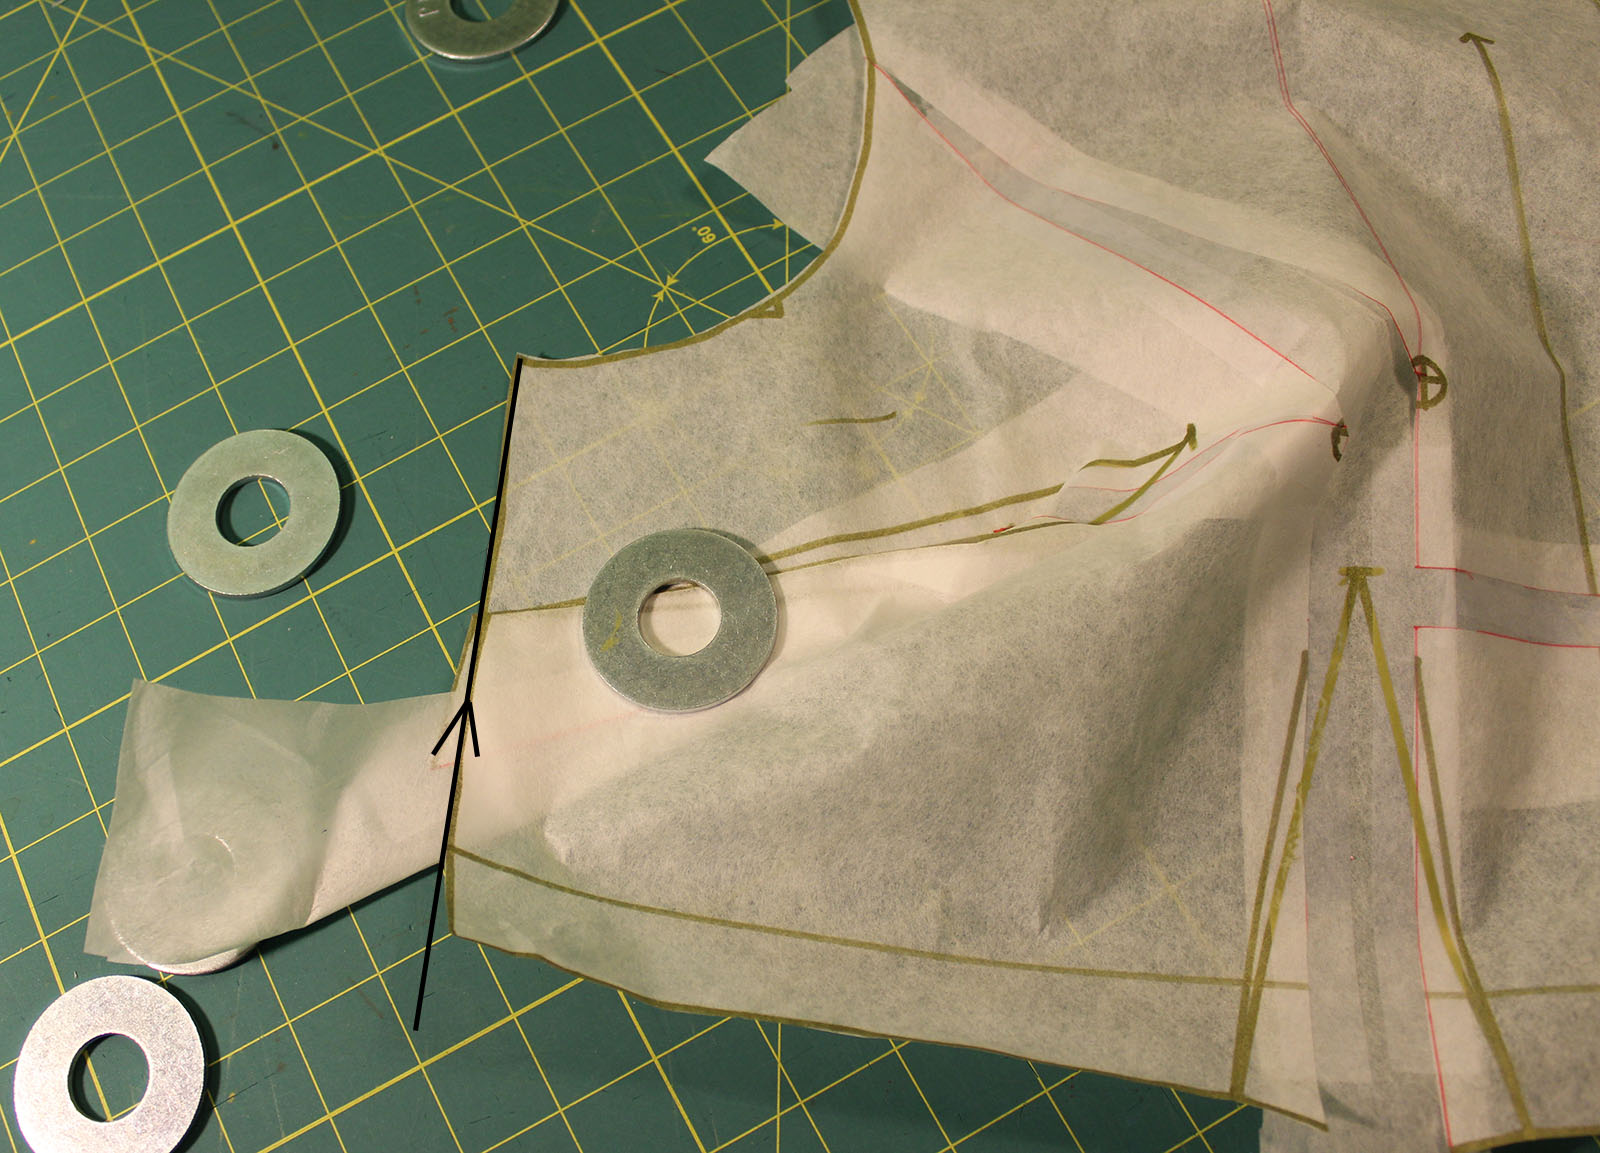
Now that your pattern piece is slashed and spread, it's time to make our final cut. You know Line #4? Cut clean through it, from the Center Front all the way to the red line, as demonstrated in black above.

Step Eight: 

Step Ten 

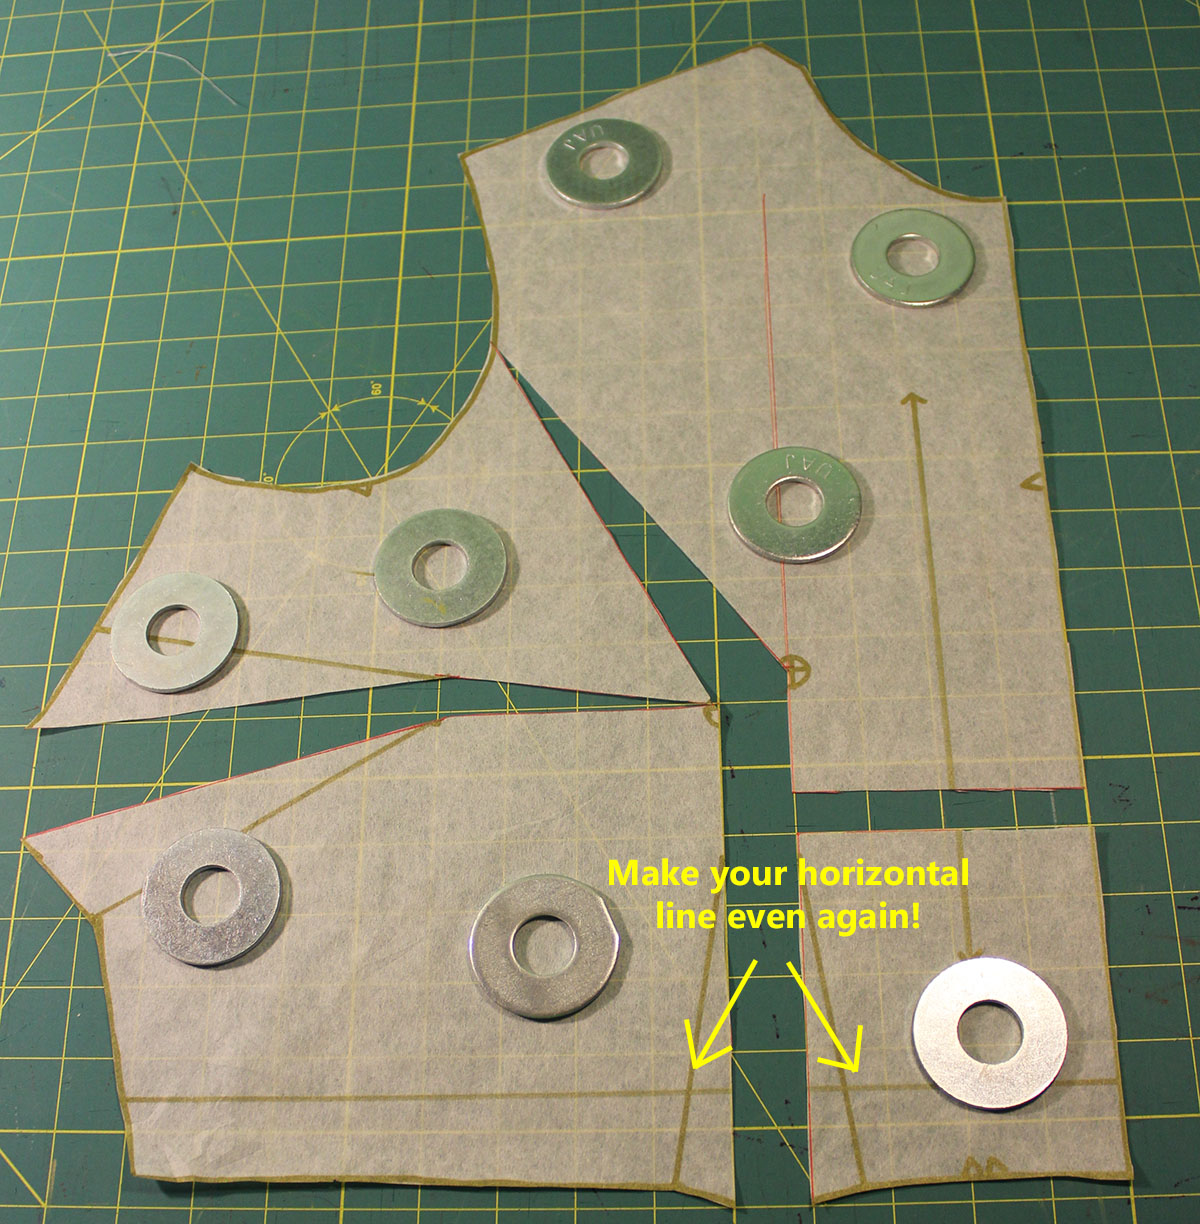
Move that little bodice piece down, until your horizontal lengthen/shorten line is once again even. Secure with a pattern weight!

Step Nine: 

Step Eleven

Very carefully put scrap paper underneath all the holes on your pattern, without shifting it around. (Hooray pattern weights!) Tape this scrap paper down. At each dart, leave extra paper past the pattern's end. We're going to redraw these darts next and will need the extra room!

Step Ten: 

Are you excited about redrawing darts? We're so close to the end. First off, however, we need to mark your bust apex on the new pattern piece. To do this, hold the piece up to yourself and mark the fullest point of your bust on the pattern piece. I've marked my own in blue in the image below.

Step Twelve

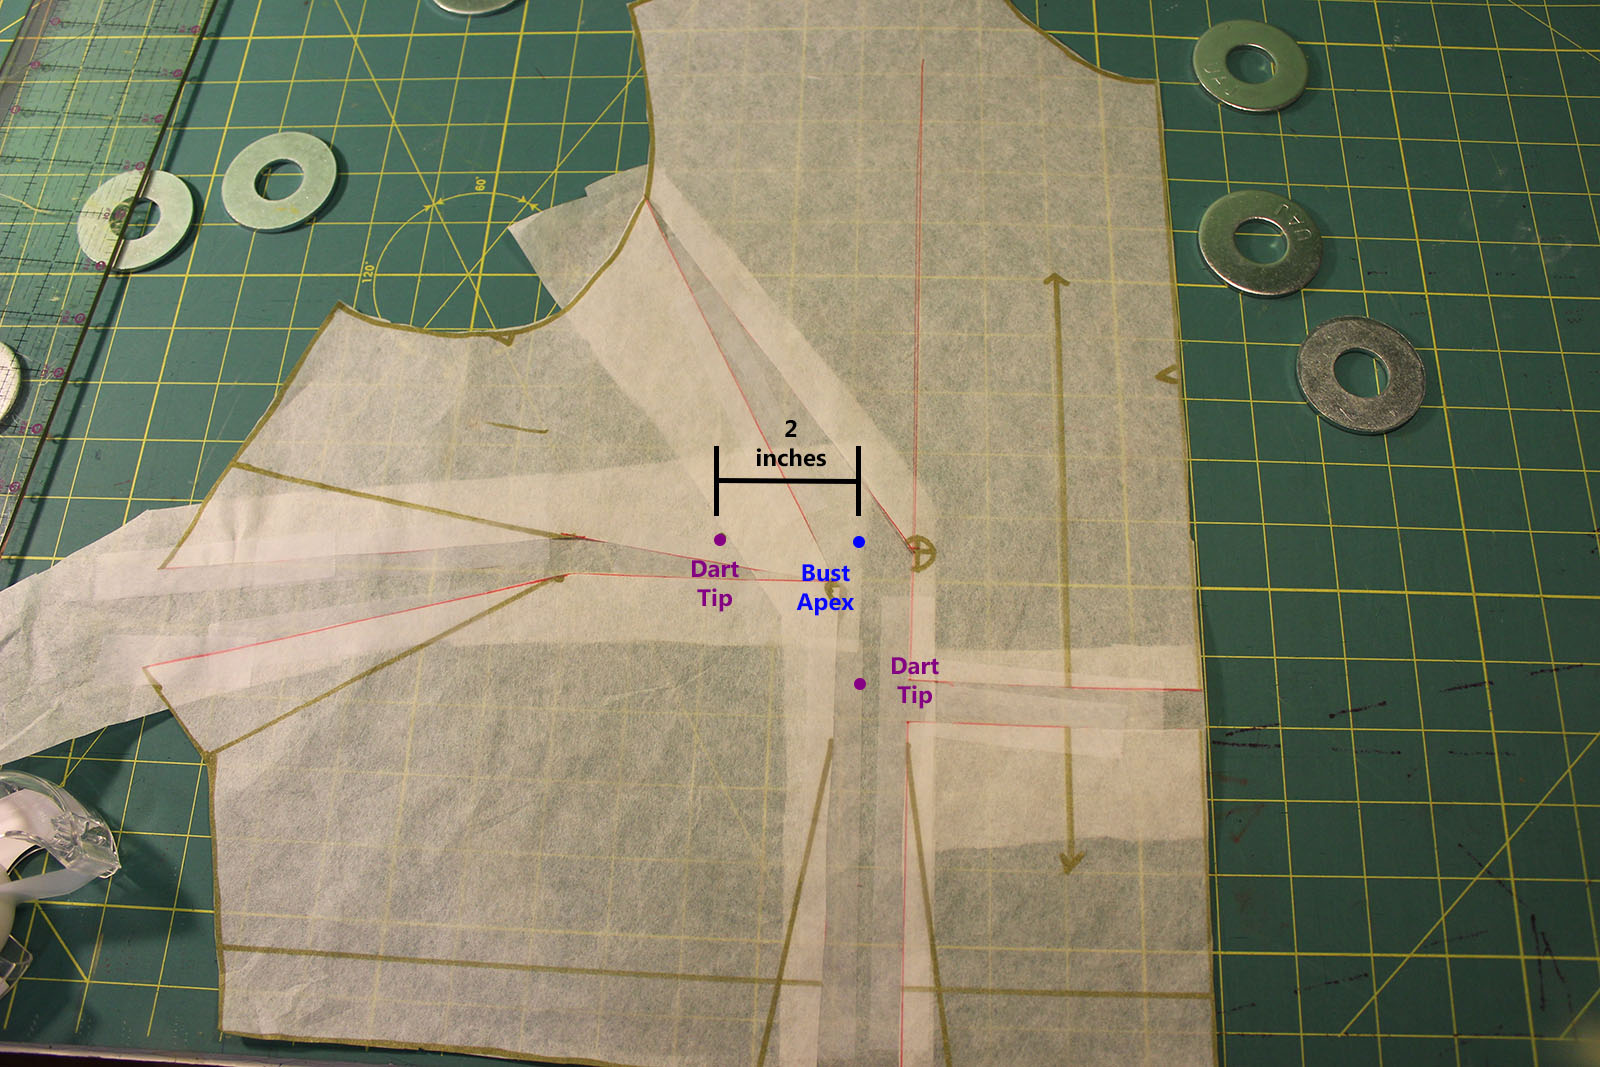
Now, there are some standard rules with darts that nobody tells you. You definitely don't want these puppies going all the way to your bust apex. That's how dreadful, pointy hideousness happens! The standard rule of thumb is to position the dart tips one inch away from your bust apex. For larger cup sizes, however, this rule doesn't always hold true. If you have a large bosom, your actual bust apex takes up more room, after all. Over time, you will find what works best for you, but for large busts, I like the dart tips to be two inches from the apex instead.

To mark these, measure two inches to the left of your bust apex, then mark that dot for your side bust dart. Then, measure two inches below your bust apex, and mark that dart for your waist dart. I've marked these dots in purple in the above image.

You have new dart ends! Woohoo!

Note: Some people prefer to mark their apex, before doing an FBA spread, but this depends on personal preference. Whatever order you find the most helpful will come to the same end! I find that my apex is rarely in line with the pattern's apex, but instead on a horizontal plane, just to the outside. (I'm told that this is a common Very Large Bosom issue.) For this reason, I mark it after slashing and spreading, so that I can better see how the dart placement is. If your apex does not line up with the original pattern's or your new slashed bodice, it's really easy to move your darts. I like to do this, after finishing the FBA and find this method particularly helpful. 

Step Eleven:

Step Thirteen

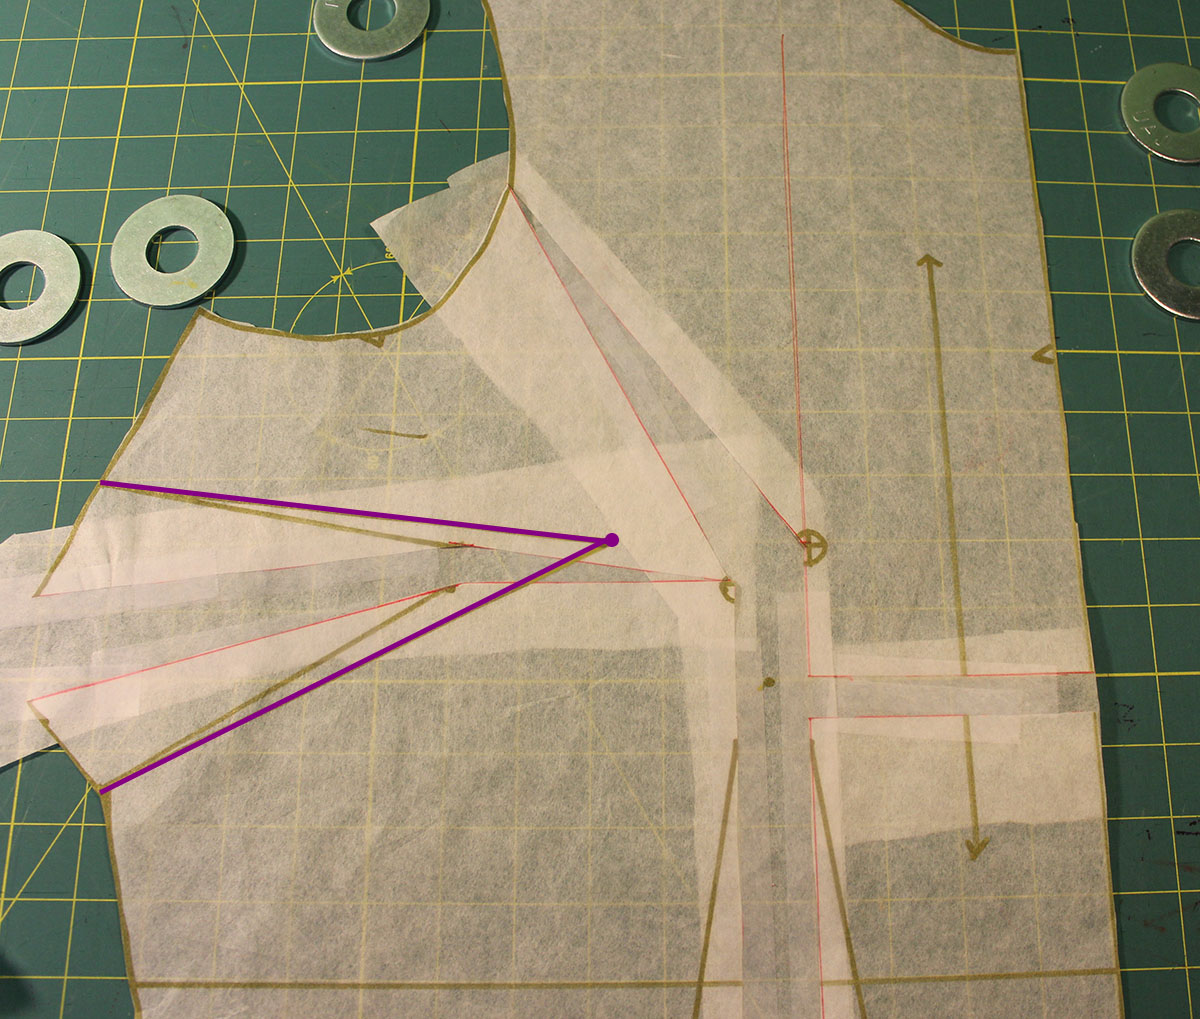
It's now time to redraw your side bust dart! To do this, use your ruler and draw two straight lines from the original dart ends, to your new dart tip. I've done this in purple above. Completely ignore the original dart legs. You're blazing your own path and don't need to follow those! Just go straight to your personal dart tip. 

Step Twelve: 

Step Fourteen

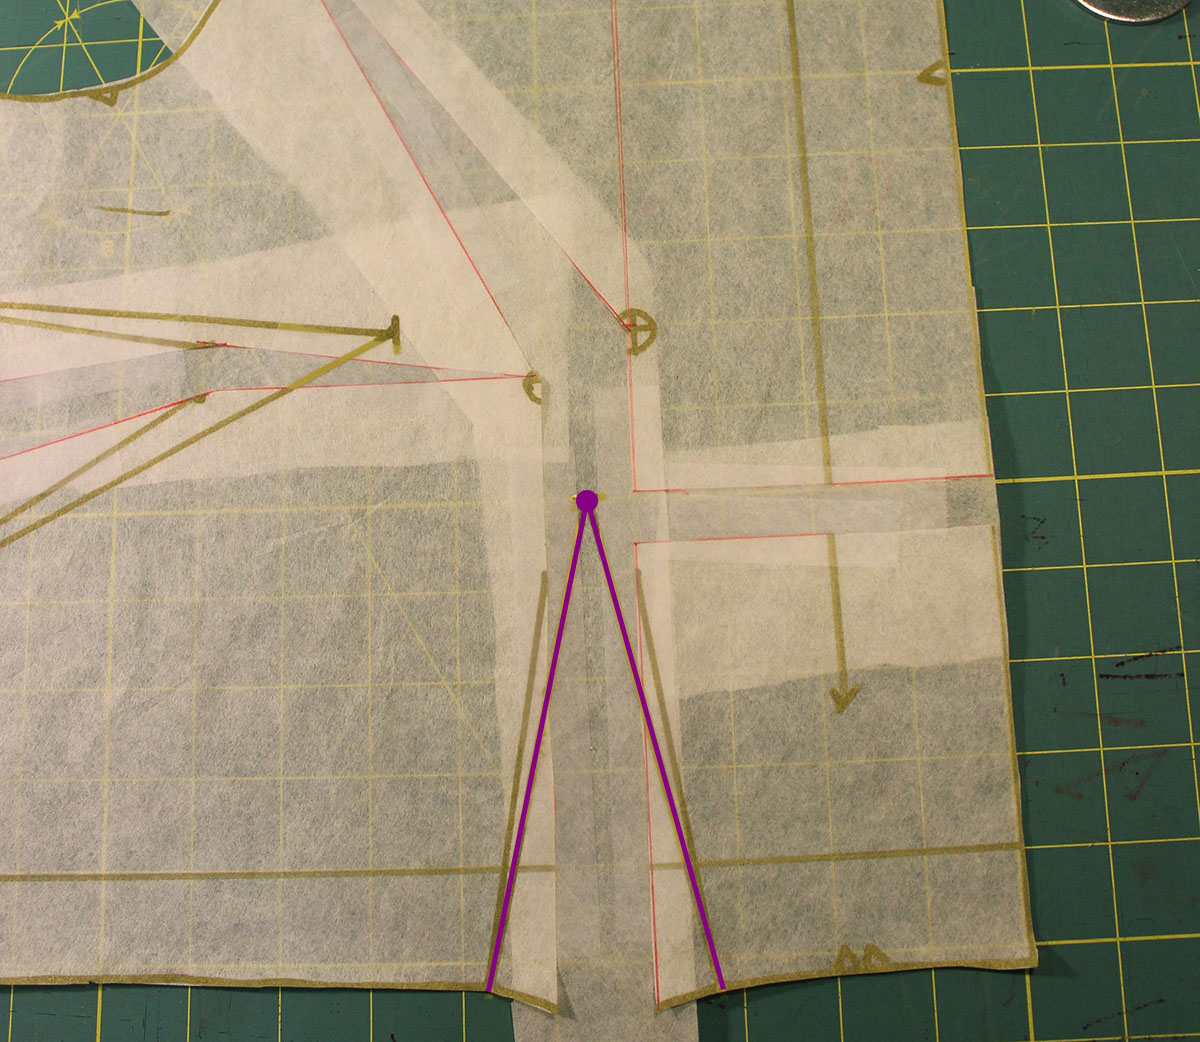
Repeat the same process for your waist dart. Beginning at your original dart ends, draw two straight lines up to your new dart tip. Once again, completely ignore that you're not following the original dart legs. Those don't matter for your needs.

Step Thirteen: 

We're so close to the end! We just need to get rid of all that extra paper.

Step Fifteen B

To do this, fold your new dart legs together, as I have done above on the side bust dart. Once you've folded them together, cut across the end of your pattern piece, noted in black in the above image. Voila! A complete dart is formed! Repeat this process for your second dart.

Step Fourteen:

Step Sixteen

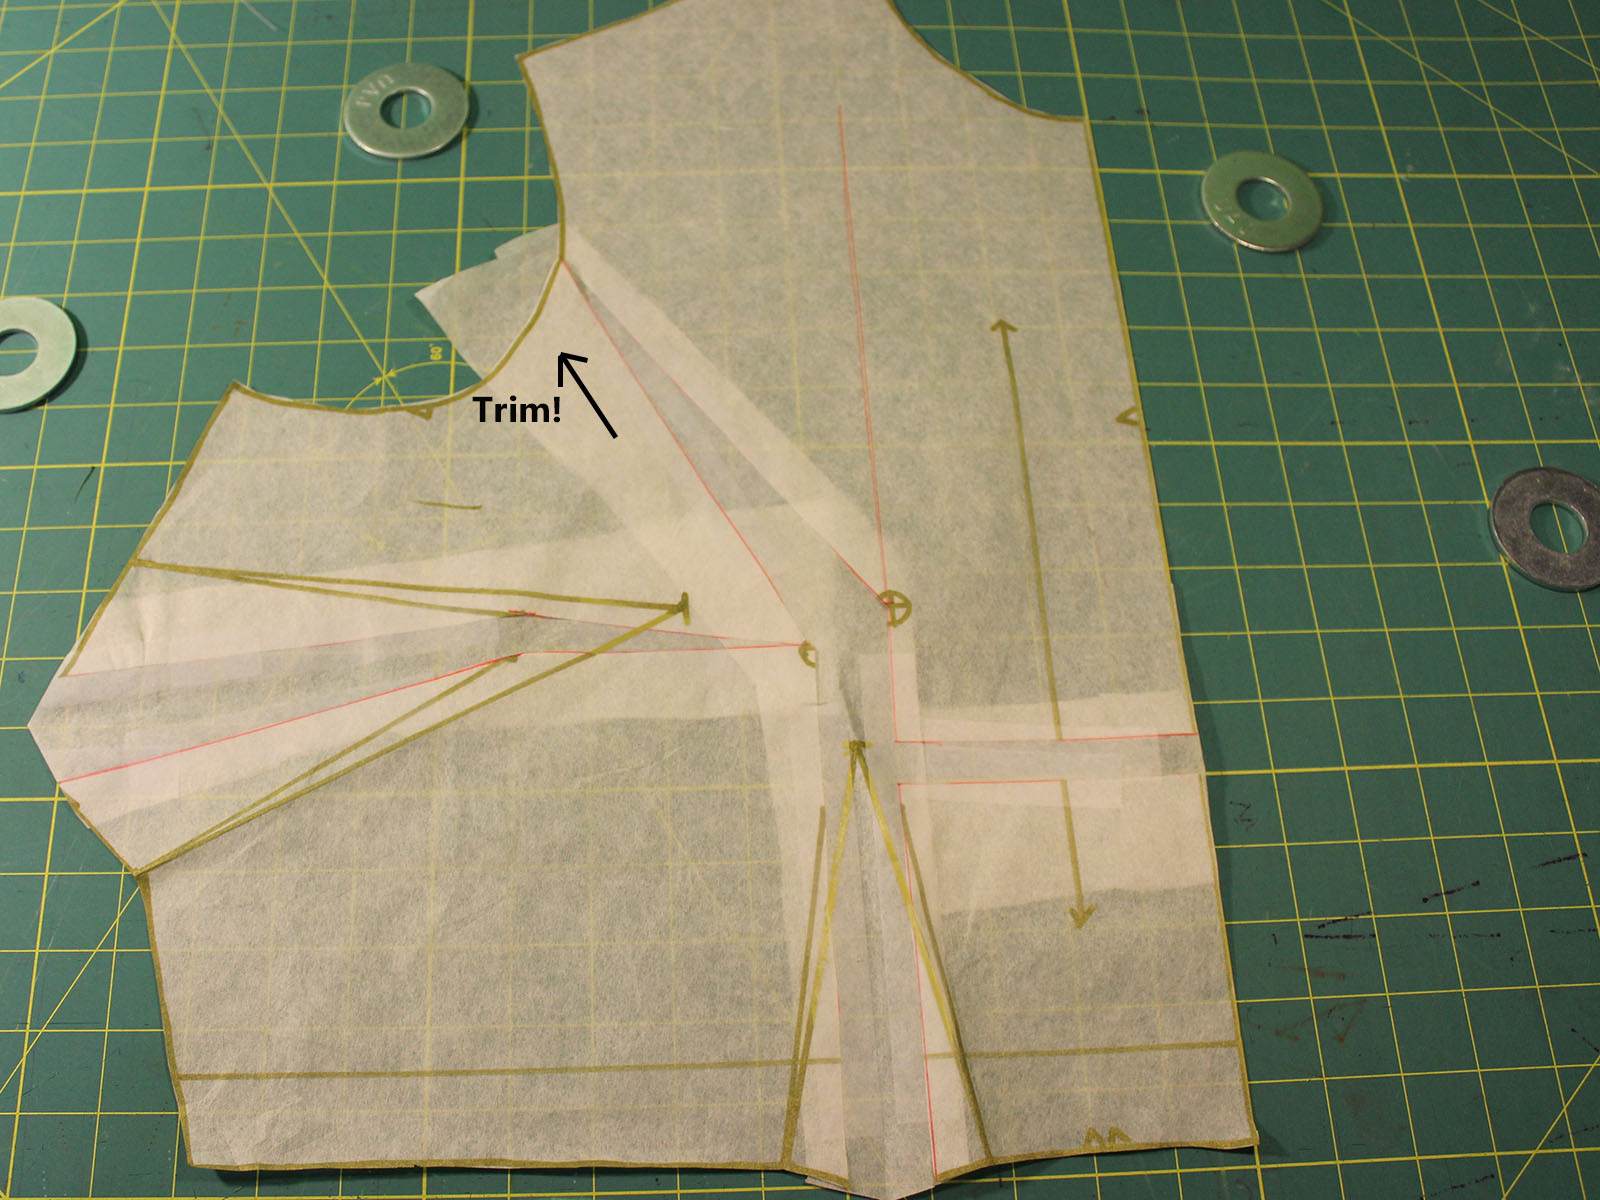
Finally, trim that extra paper along your armscye!

Step Fifteen:

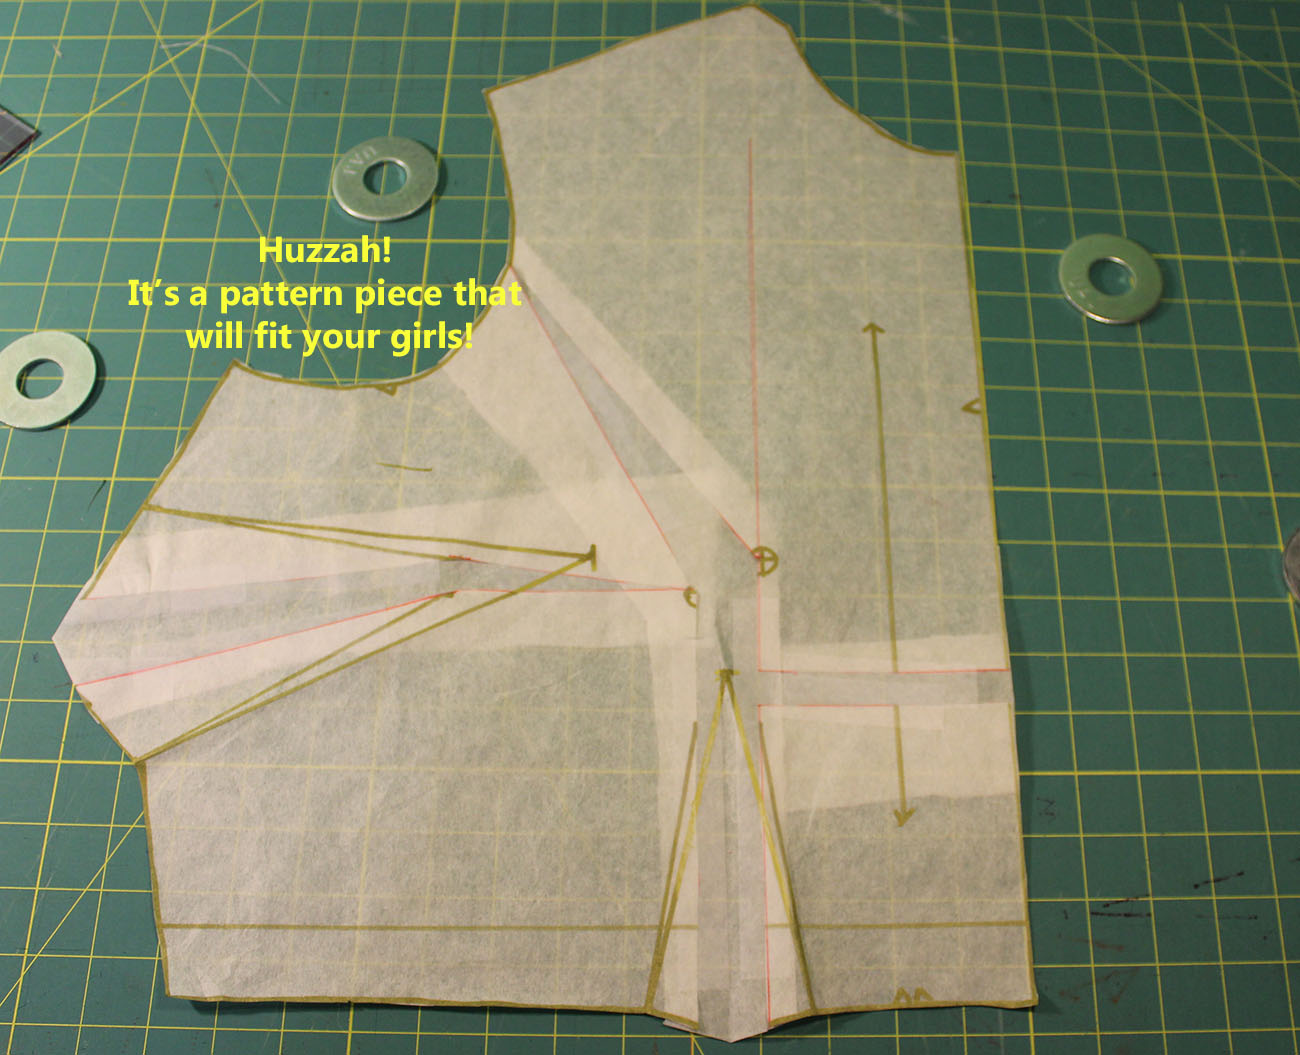
You're done! Do a happy dance!
Then, make a muslin of your new bodice and see how you like the fit.

The End

McCalls 6696 - Idle Fancy -9232

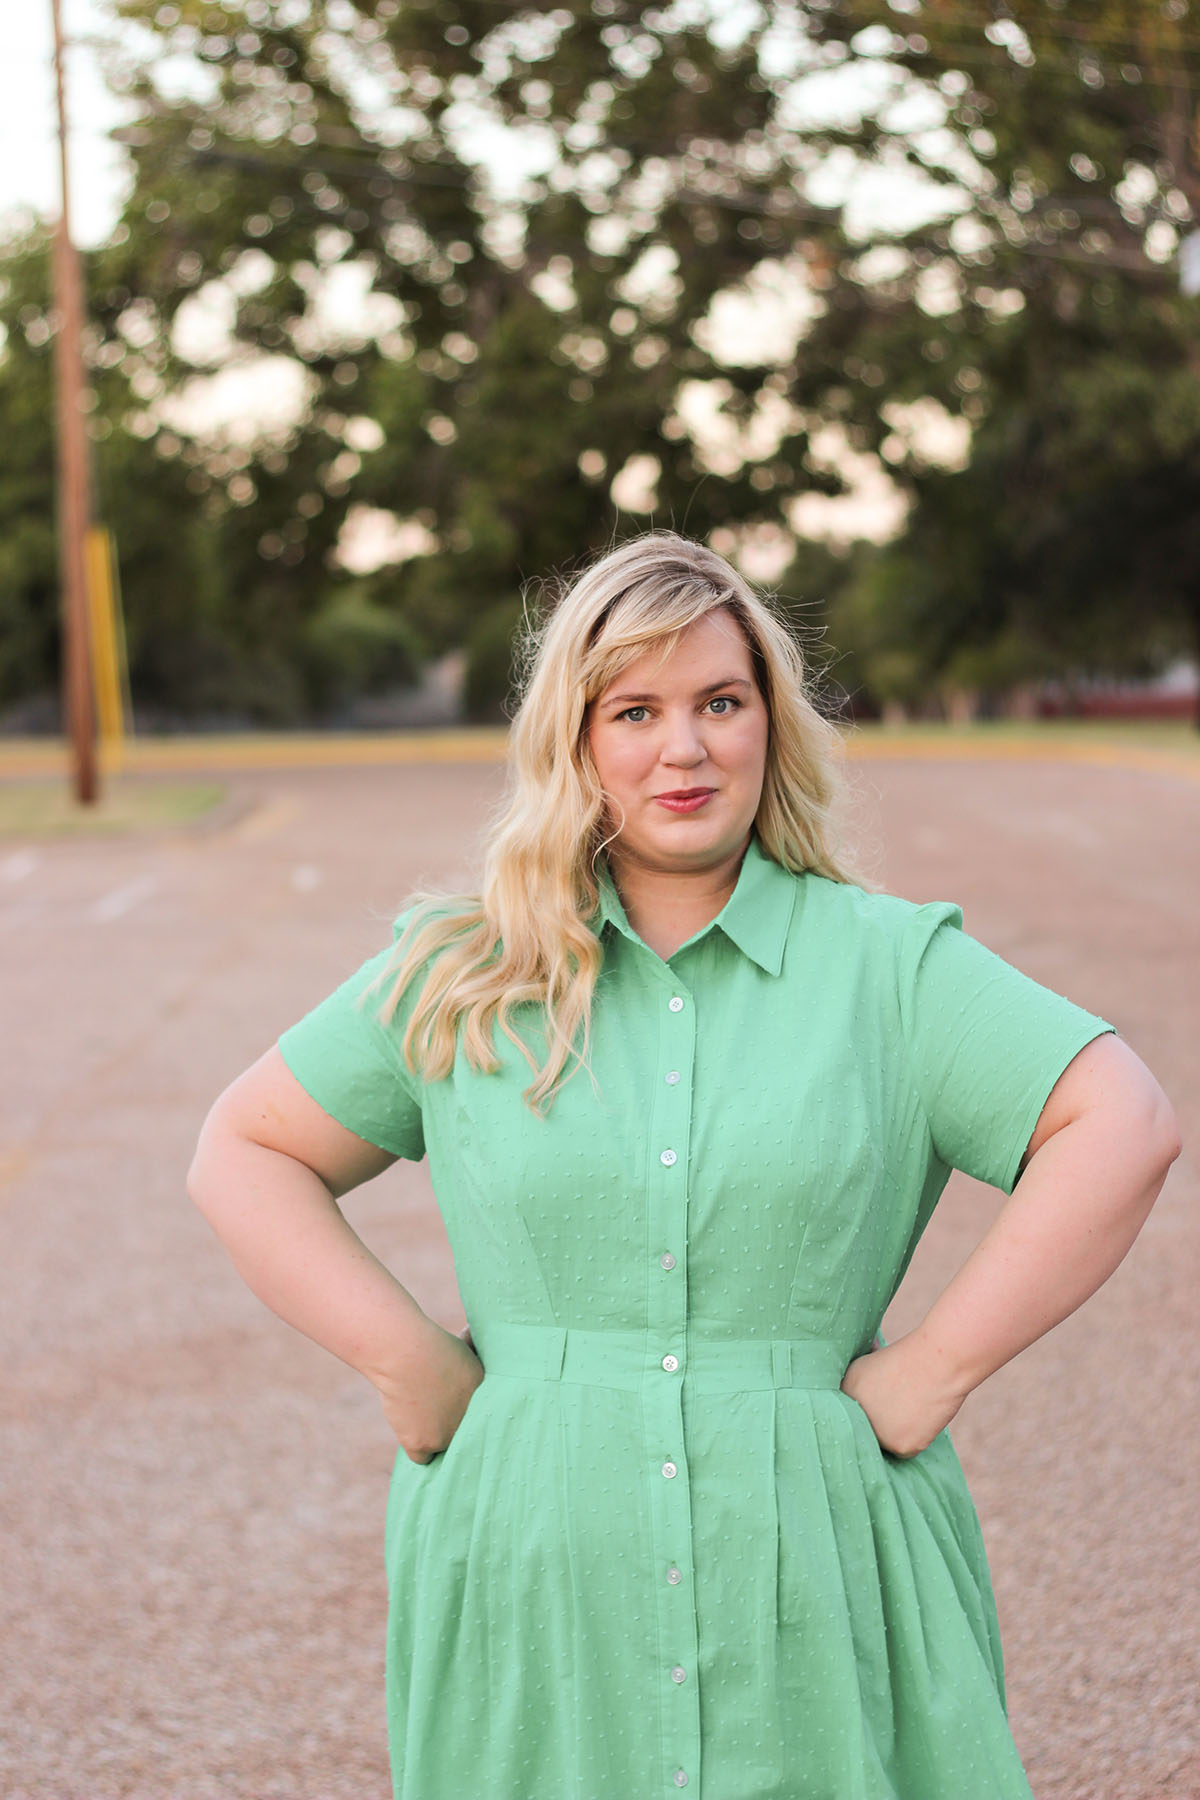
There are, of course, more advanced FBA techniques to cover, but this is a good basic process. You will be amazed by what a simple FBA can do to fix fitting woes! After completing this exact FBA, I ended up with the perfectly fitted bodice of my green shirtdress above. It's so worth the effort, don't you think?

Tomorrow, I'll round up a list of my favorite tutorials for other bust adjustments. This will include a small bust adjustment, dividing unwieldy darts, and moving bust points. There are, also, the aforementioned more complex versions of an FBA that I'll include, for those who are curious about other methods.

Note: All Amazon links in this post are now affiliate links, which means I could get a tiny portion of anything referred from this site. 

Friday, October 10, 2014

Miss Clara and the Autumn of 1000 Shirtdresses: A Sewing Challenge


Good evening, dear ones! Tonight, I have two fun things to share: a new shirtdress and a long promised announcement. I know, you can hardly contain your excitement, right? My announcement is just so mysterious. 

Yeah, I'm rolling my eyes, too. Let's start with the shirtdress, then move on to the (still very fun!) non-surprise, shall we? 

This dress is yet another version of McCall's 6696, The Shirtdress Pattern of Wonder and Bliss. Last month, I bought a length of Robert Kaufman's Dotted Chambray in a lovely dusty green, meant to become a button down for Sam. My intentions were so pure and loving! Then, the fabric arrived. 

Y'all, this stuff is gorgeous. It's a perfect medium-to-light weight, drapes really well, and presses beautifully. It even has "pin dots," which we all know are just grown up, man-friendly polka dots. My baser instincts demanded that I steal it, claim total ignorance about its intended use, and turn it into a shirtdress.

Ahem. My conscience quickly recovered, of course. Instead of stealing his Baylor green chambray, I ordered some in my own dear Texas A&M maroon. That's not what Robert Kaufman & co. have named these colors, of course. They are calling them "olive" and "burgundy," but I know school spirit when I see it. This is Aggie Maroon and my favorite shirtdress yet! 


You have heard about this pattern ad nauseam from me, but let's quickly go over the details anyhow. 

This dress is made up with three yards of the aforementioned chambray, ten white classic shirt buttons, and top-stitching everywhere I could get away with it. The insides are finished with my new favorite technique ever, serging with gray thread. It's shockingly unobtrusive on colored fabrics! Why don't people shout this technique from the rooftops? As someone who's extra lazy about changing out serger thread, it's a godsend. 

As for alterations, I used my pattern pieces from the last few 6696s. This means the whole dress is a Size 20, with a one-inch full bust adjustment, narrow shoulder adjustment, and wide bicep adjustment. I do need to go back and resteam the collar, since one side is bunching a bit, but otherwise it fits like a dream. Perfected patterns are so lovely.


So, another 6696. Are you tired of them yet? I'm certainly hope not. This version may be more subdued than the others, but I absolutely adore it.  Believe all the good things you've heard about Robert Kaufman's chambrays, kittens. I'm far too tempted to order this in a few more colorways, for a parade of dotted shirtdresses! 

If you're hankering for a shirtdress of your own, I have very good news. That announcement I've been teasing for a week or two is finally ready to be shared. The Autumn of One Thousand Shirtdresses is now an official sewing challenge!


Multiple people asked if I would host a sew-along for McCall's 6696, as part of my own quest to make all the shirtdresses. Honestly, an official sew-along is something I've never wanted to host for a couple of reasons. Not only is it a ton of work, as the lovely Jenny can attest, but most of the information necessary is already out there. People far wiser than I have already done tutorial after tutorial, on everything from collar stands to sleeve plackets. What exactly would my own be adding?

Instead, The Autumn of 1000 Shirtdresses will be a sewing challenge. Over the next two months, I'll work through McCall's 6696 in a logical way, though it won't be a classic step-by-step guide. Instead, I'll post a ton of shirtdress specific information, including helpful tutorial round-ups, thoughts on fabric choices, guides to various patterns, and some of my own adjustments, hacks, and tricks. As we go along, I'll keep sharing my own shirtdresses and all the ones that you make, as well! 

Even better, there are prizes. Of course. Once the challenge wraps up on January 10th, I'll draw a name out of the Flickr pool and give away a bundle of lovely fabrics for future shirtdresses, as well as a vintage shirtdress pattern in the winner's size. Woohoo!

So, what are you waiting for? Grab a badge below, pick out some lovely buttons, and get sewing! You can use the #1000Shirtdresses hashtag throughout the challenge, on both Instagram and Twitter, and share all of your makes in our Flickr Group. You're also not limited to using 6696--feel free to pick any shirtdress pattern you own, whether it buttons all the way or even just half way. The more shirtdresses, the merrier!

A Note for those Down Under: Southern Hemisphere folks, don't fret. You'll notice there's a special The Spring of 1000 Shirtdresses button for you, as well. Bring on the pretty eyelets!


Idle Fancy

Idle Fancy


Note: You're not going mad. The dates of this challenge have, in fact, been changed. I wanted as many people who wanted to join to have the chance, so bumping the end date past the holidays seemed the bet plan!

Tuesday, September 2, 2014

Miss Clara and the Many Happy Returns: McCall's 6696


Hello, kittens! As promised, today I'm back with another version of McCall's 6696 and the furthering of my shirtdress obsession. Though this is my third iteration, this is actually the dress that kicked off the Autumn of 1000 Shirtdresses. When I ordered this fabric, a Ming green tufted voile from Mood, I knew its fate lay in buttons and collar stands.

This pattern is explicitly designed for light, translucent fabrics like eyelets, lace, and Swiss dot. Along with all the pieces you need for a shirtdress, 6696 also includes instructions and pieces for a bias-cut slip to go underneath. Perfect for my semi-sheer voile! My MSN project for September was an easy decision, with this pairing.


Construction-wise, there really isn't anything new to say about this dress. The only major difference from my previous iterations is the addition of sleeves Other than a small wide bicep adjustment, this is the original sleeve pattern, complete with a slightly puffed sleeve cap. In a sturdier fabric, I would probably remove a bit of ease from the cap to lessen that poof, but with such a drapey fabric like voile, it's a really soft look.

What's lovely about this fabric is that every design element looks softer. The pleats float around my hips, the back is gently gathered, and the collar turned beautifully. Of course, the fabric also wrinkles like crazy with one look, but that's voile for you. What you get in billowy, summer goodness, you exchange for shape retention. It really doesn't phase me at this point!

To finish the main dress off, I chose translucent white buttons for the closures. Simple, easy, and classic! Meanwhile, the yoke and waistband facings are done in the same tufted voile.

Ignore the weird sleeve happening on the right back, my dears. I spent this whole shoot with that sleeve unknowingly hiked up! Shite happens, no?


As for the slip, that was such an easy project! It's two pieces, front and back, plus straps. Everything is cut on the bias and perfectly skims over the body and under the dress. I had some green bamboo voile in my stash, which was the perfect consistency for the slip. It's slick like charmeuse, but breathes beautifully. Even better, it was the perfect color to go under this voile--just a bit brighter and deeper, to enhance the color.

Unfortunately, I also didn't hem it quite short enough for breezy Texas days. You can check out a peep of the slip in the photo below! Since that first foray out into the world I've hemmed it an additional two inches for safety's sake.


In the end, this is such a perfect end-of-summer dress. I love the fabric weight, the little tufted dots, and the way it swirls about me as I walk. Plus, it works beautifully with my light gold wedding shoes! I haven't been able to wear these since last December, but I love how retro they look with this dress. In fact, this is the exact outfit I'll be wearing at my birthday dinner tonight! What better way to ring in 29 than in my new favorite dress and my all time favorite shoes?

McCall's 6696, you continue to make me so, so happy. Perhaps a full-sleeved version is due next? For this week's sewing project, I've got my eye on Jennifer Lauren's newest, the Dalloway dress, but after that it may be a return to the Land of Shirtdresses!

Note: The fabric for this project was provided courtesy of Mood Fabrics, as part of the Mood Sewing Network. Thanks, Mood!


UP